Cookbook:Example:Adding packages to your OS image
[WORK IN PROGRESS]. Back to Cookbook
Process Summary
Building a basic image with your package involves these steps:
- Ensure build environment is configured as per Quick Start Guide, or check out out pre-configured container.
- Selecting a target BSP.
- Selecting a Linux image type.
- Gathering the required (dependency) packages (
opencv, java, for example): layer index is good resource. - Updating the layer configuration (
build/conf/bblayers.conf) to include the BSP and feature layers. - Updating the build configuration (
build/conf/local.conf) to set the BSP machine, including features and any licenses they require.
Add packages and doing custom configurations on your image (creating your own distribution) is where creativity and flair come in. And as with any Linux-based process, there are innumerable ways to do things... there's not always one clear "right" way... so to help you get bearings, we're attempting to organize the initial list of examples we'd like to include in our Cookbook. Those that have been written, or those that are in progress will be linked. The others are on our list to work on. (As we get more, we may regroup the organization of these topics; but for now this should work:
Adding packages to your OS image is one of the most common things you need to do; you have an OS image and you want to add some functionality. We'll assume you've gone through the Quick Start and have built core-image-sato for qeumux86. In this example, we start by making a quick change to the configuration to instead make a headless build with core-image-minimal.
(This is probably a better place to start as we have a much simpler image.)
Step by Step Details
Build the image:
$ bitbake core-image-minimal
Now let's start running the resulting headless image (note we're using the nographic option):
$ runqemu qemux86 nographic
When it gets to the login prompt, use user 'root' with no password. Let's try and connect over ssh. First we need to get the IP address with ifconfig.
root@qemux86:~# ifconfig
eth0     Link encap:Ethernet  HWaddr 52:54:00:12:34:56
         inet addr:192.168.7.2  Bcast:192.168.7.255  Mask:255.255.255.0
Now try and connect to our VM from a different machine on the same sub net
$ ssh root@192.168.7.2
ssh: connect to host 192.168.7.2 port 22: Connection refused
Hmmm, a Connection Refused error. Let's check if we have an ssh server running
root@qemux86:~# ps | grep sshd | grep -v grep
root@qemux86:~#
Nope. So let's add one. First we need to exit the qemu session. Hit CTRL+A then C. You should see the on the console:
QEMU 2.5.0 monitor - type 'help' for more information
(qemu)
Type quit and you're out.
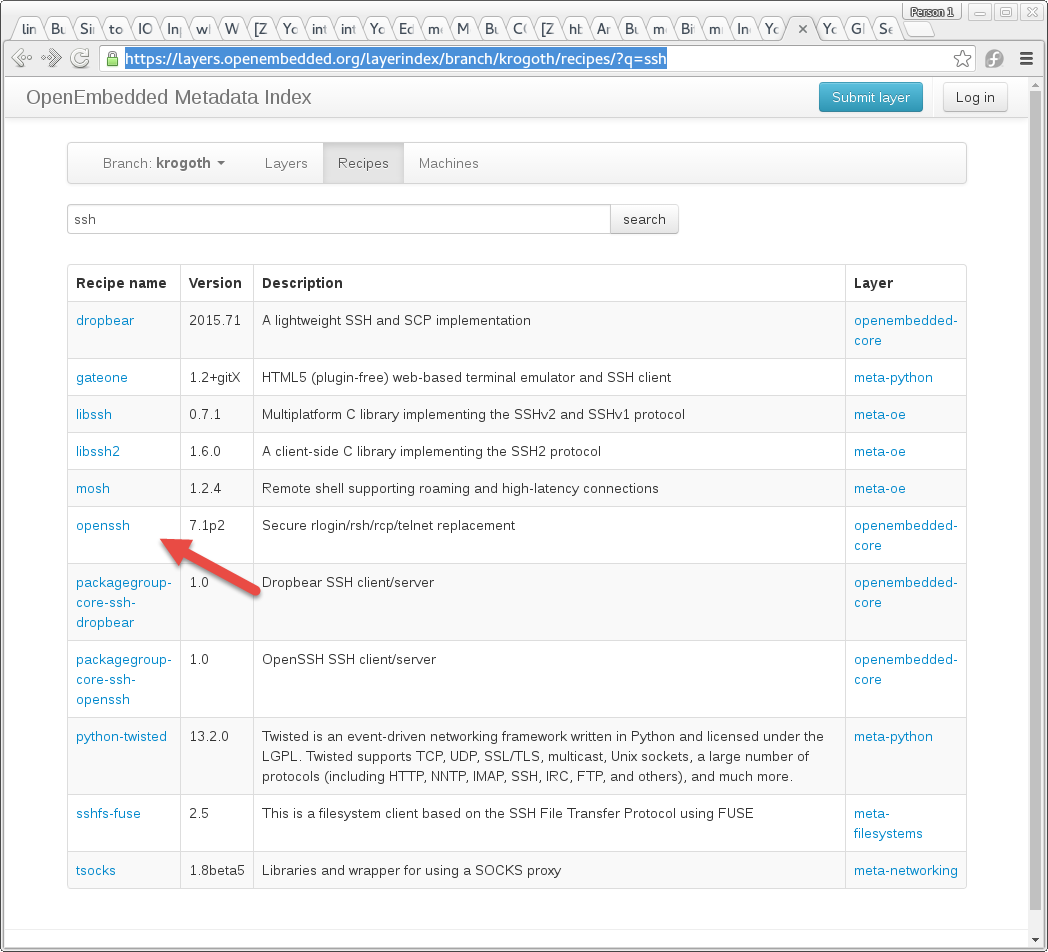
Now we need to find the Yocto Project recipe that includes sshd. The way to find recipes is to go to the https://layers.openembedded.org web site. Select the krogoth branch and click on the Recipes button at the top:
The entry openssh looks like the right thing (summary needs to be fixed!). So let's add it to the image by adding this line to conf/local.conf:
CORE_IMAGE_EXTRA_INSTALL += "openssh"
Now rebuild image
$ bitbake core-image-minimal
How do we quickly check that sshd has been installed? First let's find where the openssh package was built. Since it was to run on the target, work files can be found in build/tmp/work/$TARGET_SYS. First we need to find the value of TARGET_SYS. Each time you run bitbake, this value is displayed. Build Configuration:
BB_VERSION        = "1.31.0"
BUILD_SYS         = "x86_64-linux"
NATIVELSBSTRING   = "universal"
TARGET_SYS        = "i586-poky-linux"
MACHINE           = "qemux86"
DISTRO            = "poky"
DISTRO_VERSION    = "2.1+snapshot-20160509"
TUNE_FEATURES     = "m32 i586"
TARGET_FPU        = ""
meta
meta-poky
meta-yocto-bsp    = "master:3cb5dead2808482baf3ffae5ed961c72f2ea275f"
See we can see TARGET_SYS = "i586-poky-linux". A more general way of doing this is displaying the bitbake environment and searching for a variable using grep:
$ bitbake -e | grep ^TARGET_SYS
TARGET_SYS="i586-poky-linux"
Now we look into the folder build/tmp/work/i586-poky-linux/openssh. Here we find folders for each package version that is built. Typically there is just one.
$ ls tmp/work/i586-poky-linux/openssh
7.1p2-r0
All the files installed on the target will be tmp/work/i586-poky-linux/openssh/7.1p2-r0/package. Let's look for sshd
$ find tmp/work/i586-poky-linux/openssqemux86-poky-linuxh/7.1p2-r0/package -name sshd
tmp/work/i586-poky-linux/openssh/7.1p2-r0/package/etc/init.d/sshd
tmp/work/i586-poky-linux/openssh/7.1p2-r0/package/usr/sbin/.debug/sshd
tmp/work/i586-poky-linux/openssh/7.1p2-r0/package/usr/sbin/sshd
We found it! And it'll be installed into /usr/sbin/sshd. Let's see if it has appeared in rootfs (found in build/tmp/work/$MACHINE-poky-linux/image-name/1.0-r0/rootfs.
For us, the translates to:
$ ls tmp/work/qemux86-poky-linux/core-image-minimal/1.0-r0/rootfs/
bin  boot  dev  etc  home  lib  media  mnt  proc  run  sbin  sys  tmp  usr  var
Let look for sshd
$ ls tmp/work/qemux86-poky-linux/core-image-minimal/1.0-r0/rootfs/usr/sbin/sshd
tmp/work/qemux86-poky-linux/core-image-minimal/1.0-r0/rootfs/usr/sbin/sshd
Found it! Now we know it'll be in the image, so let's start running the image we just built:
runqemu qemux86 nographic
And we see this in the boot message which looks promising:
Starting OpenBSD Secure Shell server: sshd
Now let's see if its running
root@qemux86:~# ps | grep sshd | grep -v grep
 389 root      5352 S    /usr/sbin/sshd
Yup! Let's try to connect from another machine
$ ssh root@192.168.7.2
The authenticity of host '192.168.7.2 (192.168.7.2)' can't be established.
ECDSA key fingerprint is SHA256:RbNcfuY+gHOZ8vdF5+M/CqVNVpELIY6KayT0ilDYsfs.
ECDSA key fingerprint is MD5:42:0d:84:b3:5b:d8:42:38:ea:38:fd:97:f8:a3:4c:c4.
Are you sure you want to continue connecting (yes/no)? yes
Warning: Permanently added '192.168.7.2' (ECDSA) to the list of known hosts.
root@qemux86:~#
We're in!
In this example, we showed how find a Yocto Project recipe that includes a package we're interested in (openssh),
and how to add the openssh package to the image by editing conf/local.conf and doing another bitbake build.
We also tested our new image using the qemu emulator to verify that ssh capability was now present.
Back to the Cookbook home page.
