Yocto Website Advisory Board Ballot Creation
Documentation for administrative tasks on https://yoctoproject.org (and https://www.yoctodev.org)
Advisory Board Ballots
You must have the role "admin" to create ballots and the role "advisory board" to view or vote on them.
There are several ways you could make an new Advisory ballot, including creating a new node and making a webfrom from scratch or cloning an existing ballot. The following directions are meant to be the fastest, cleanest and most consistent way to make a new ballot.
You start with an example ballot called, Template - DO NOT DELETE. It has one item already created for voting. You'll clone the ballot, then customize the item for voting. If people will be voting on more than on thing, you can add additional items. Grouping multiple items on a single ballot makes the AB members' job easier.
Clone the template:
- Log into the site: https://www.yoctoproject.org/user
- Visit My Workbench > Advisory Board Ballots
- Click the Clone a new ballot link and press Clone.
- Edit the Title with the pattern of "AB Ballot - DD MMM YYYY"
- The Directions field is generally not used, but if you need to add text above all the ballot items, this is the place to do it.
- Click Save
- After saving, you're on the ballot page. Click Webform
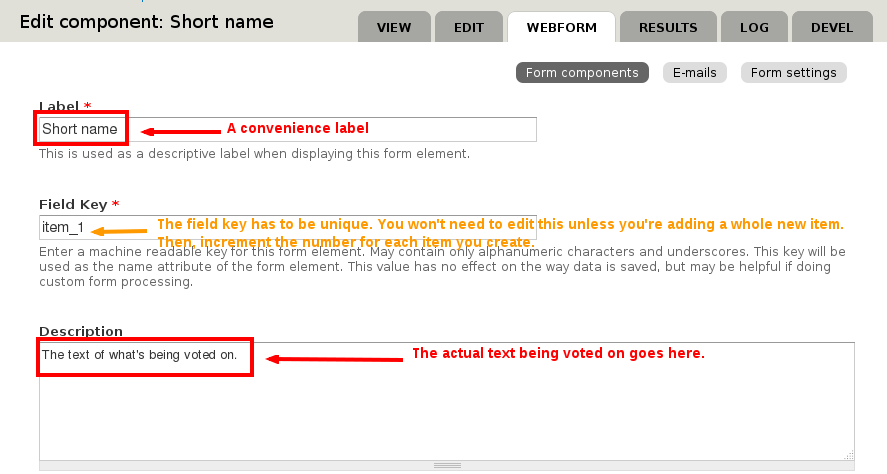
- Customize the ballot item by clicking the Edit link for the Short name fieldset
- Customize the Label and Description
To add additional ballot items On the Webform tab's Form components sub-tab:
- Click the Clone link in the "Short name" label row
- Edit the Label
- Increment the Field key from item_1 to item_2 (or item_3 or whatever ... it must be unique. It's best to follow the pattern and keep them sequential)
- Add the text of the item being voted on in the Description field
- Click "Save component"
- Drag your new item to right spot (second for item_2, third for item_3, etc.)
To make the ballot available:
- New ballots are Unpublished by default. Edit the node to publish.
- New ballots are Open by default (but that won't matter if the node is unpublished - users won't be able to access it)
Closing voting:
- Ballots don't automatically close. To stop voting, visit the Form settings sub-tab on the node's Webform tab and close the ballot.
