Virtualization with KVM: Difference between revisions
Mihai Prica (talk | contribs) No edit summary |
Mihai Prica (talk | contribs) No edit summary |
||
| Line 63: | Line 63: | ||
#** Device model: e1000 | #** Device model: e1000 | ||
These are the standard steps. There are some additional steps depending on the type of image and the location of the image. | These are the standard steps. There are some additional steps depending on the type of image and the location of the image. | ||
# | # Graphical User Interface | ||
#* '''Video''' | #* '''Video''' | ||
#** Model : vmvga | #** Model : vmvga | ||
| Line 75: | Line 75: | ||
You can add other hardware using the Add hardware command. | You can add other hardware using the Add hardware command. | ||
# Click Begin Installation and click on the Console button to connect to the VMs console. | # Click Begin Installation and click on the Console button to connect to the VMs console. | ||
# Remote connection | |||
# If virt-manager has connected to a remote host there are some extra configurations for the image: | |||
# | #* Before running the wizard copy the images on the rootfs of the image. The image comes with the openssh-server package so scp can be used to do the data transfer. | ||
# | #* At step 2 the '''Browse local''' button is disabled, because it would be a security hazard if you could browse the local file system. You have to copy the required imaged to '''/var/lib/libvirt/images''' on the target image or just create links. | ||
Revision as of 12:20, 9 November 2012
Virtualization is a hot topic in the operating systems world these days. The use cases vary from server consolidation, virtual test environments to Linux enthusiasms who can’t decide which distribution is best. The Kernel-based Virtual Machine, kvm is a popular full-virtualization solution for Linux based systems. It can be used to run guests systems on systems with hardware virtualization extensions (AMD-V or Intel VT-x).
The goal of this project was creating a minimal solution that would allow a user to run virtual machines (VM) over yocto. KVM was choosen as the virtualization solution because of the strong community support it enjoys and for the easy integration.
Packages
The project is based on the meta-xen layer from oe-core. This layer creates a target image that can act as a host for running multiple guest operating systems using the Xen hypervisor. It also features recipes for the libvirt package and for most of its dependencies. There are a number of other dependencies that come from the meta-oe layer of oe-core.
KVM
KVM can be used to run multiple virtual machines that contain unmodified Windows or Linux images. The kvm component is included in the mainline Linux kernel starting from version 2.6.20. Since yocto uses 3.4.11 or a newer version of the Linux kernel, no extra packages are required only a proper kernel configuration.
QEMU
QEMU is a popular process emulator that uses dynamic binary translation to achieve a reasonable speed while being easy to port to new architectures. The recipe for the qemu package is included in the standard poky distribution and it comes with built-in support for KVM and for all the new advanced features like virtio, which is the main platform for IO virtualization. If the underlying hardware does not provide support for KVM or if it has been disabled, qemu can be used to run the VMs using software emulation, but with a performance loss.
Libvirt
Libvirt is a toolkit for interacting with virtual machine hypervisors( Xen, KVM, VMWare ESX etc.). The set of tools include an C API library that comes with bindings for common languages, a daemon (libvirtd), and a command line utility (virsh). The functionality is exposed through the virsh command. The library is also used by a number of modern VM management systems to handle typical tasks when dealing with VMs.
Our layer builds libvirt only for qemu support to keep the image as minimal as possible. To configure libvirt for other hypervisors you just have to make some minor modifications to the recipe provided by the meta-xen layer. An example of how to remotely connect using Virt-manager to control the VMs can be found in the next section.
Virtual Machine Management
CLI
If you already have an existing KVM image(the disk image and optionally the kernel image), it can run it from the CLI using the various qemu-system-* commands depending on the desired guest architecture. To connect to the console of the VM, the user has to configure a vncserver to start on the guest. The vnc option can be used for this.
Virsh is a powerful tool that can be used to create and manage VMs. It has a quite complicated syntax and it's not used directly in general.
The target image does not contain any additional tools for the creation and the management of the virtual machines, but the libvirtd daemon is configured to listen for new connections. This allows other tools like virt-install to remotely connect to the hypervisor running on the system and run all the commands on the host.
Virt-install utility is a CLI tool for the creation of new VMs. A tutorial on how to use virt-install for the creation of VMs can be found here.
GUI
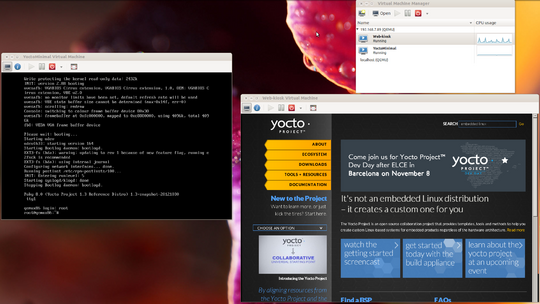
Virt-manager is a popular desktop interface for managing VMs. It offers an interactive wizard for the creation of new virtual machines and it presents statistics on the resource utilization of the running domains. To communicate with the hypervisors it requires the libvirt toolkit installed on the host systems. It can also be used to manage VMs that run on remote hosts. For this, the libvirt daemon running on the host system. In our target image the libvirtd daemon is configured to listen for new TCP connections. Authentication is disabled by default so no special credentials are required for the connection.
How to connect to the target
- Install virt-manager on the system.
- Start a new virt-manager instance by running virt-manager from the command line.
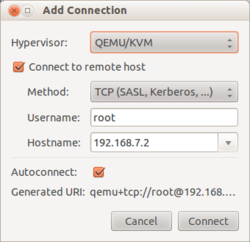
- Create a new connection : Select File -> Add Connection
- Check Connect to remote host
- Method : TCP
- Username: name of the user on the remote host. For the kvm image use root.
- Hostname: the IP address of the kvm image.
At this moment, you should have a new active connection in the main window. A practical tutorial with all the available options can be found here.
How to run a Yocto image using virt-manager
This tutorial presents the necessary steps to start an Yocto image using virt-manager. This allows you to add new hardware devices or make custom configurations. It can be used as an alternative for the standard runqemu script which lacks support for advanced configurations.
- Install virt-manager on the system.
- Start a new virt-manager instance by running virt-manager from the command line.
- Select the connection you want to use and click on the Create a new virtual machine icon from the menu which.
- Step 1
- If kvm is not enabled on your host system an error message will appear.
- Set the name for the new VM.
- Select Import existing disk image on how to install the OS.
- Step 2
- Browse for the disk image. Select browse local and look for the disk image that was generated after running bitbake. This should be located in tmp/deploy/images in your local poky build directory.
- Live the OS type and Version to generic.
- Step 3 - choose the amount of RAM and number of CPU allocated to the new VM.
- Step 4
- Check Customize configuration before install
- Click Finish
- A new screen will appear with the detailed configuration of the new VM. Additional configuration are required to make the image boot:
- Boot options
- Direct kernel boot
- Kernel path: Browse the disk for the kernel image. This is located in the same place as the disk image and starts with bzImage.
- Kernel arguments: root=/dev/hda ip=dhcp
- NIC
- Device model: e1000
- Boot options
These are the standard steps. There are some additional steps depending on the type of image and the location of the image.
- Graphical User Interface
- Video
- Model : vmvga
- Controller USB
- Model USB 2
- Add hardware
- -> Input -> Type: EvTouch USB Graphics Tablet
- Video
- Remote
- Display VNC
- Delete the standard Display VNC hardware and click Add hardware > Graphics and check Listen on all public network intefaces.
- Display VNC
You can add other hardware using the Add hardware command.
- Click Begin Installation and click on the Console button to connect to the VMs console.
- Remote connection
- If virt-manager has connected to a remote host there are some extra configurations for the image:
- Before running the wizard copy the images on the rootfs of the image. The image comes with the openssh-server package so scp can be used to do the data transfer.
- At step 2 the Browse local button is disabled, because it would be a security hazard if you could browse the local file system. You have to copy the required imaged to /var/lib/libvirt/images on the target image or just create links.

