Quality Assurance yocto project: Difference between revisions
No edit summary |
No edit summary |
||
| Line 50: | Line 50: | ||
NOTE: the images are available in sato and lsb form( access genericx86-lsb and genericx86-64-lsb directories for lsb images) | NOTE: the images are available in sato and lsb form( access genericx86-lsb and genericx86-64-lsb directories for lsb images) | ||
<p>3. The checkout step is the same as BSP.</p> | <p>3. The checkout step is the same as BSP.</p> | ||
<p>4. Edit local.conf</p> | <p>4. Edit local.conf, adding at the end the following confuguration</p> | ||
<ul><li>The #1 steps are followed for lsb images</li></ul> | |||
<ul><li>Download the core-image-lsb-sdk image from autobuilder( link available in the point release mail)</li></ul> | |||
NOTE: The images are available in sato and lsb form( access genericx86-lsb and genericx86-64-lsb directories for lsb images) | |||
---- | ---- | ||
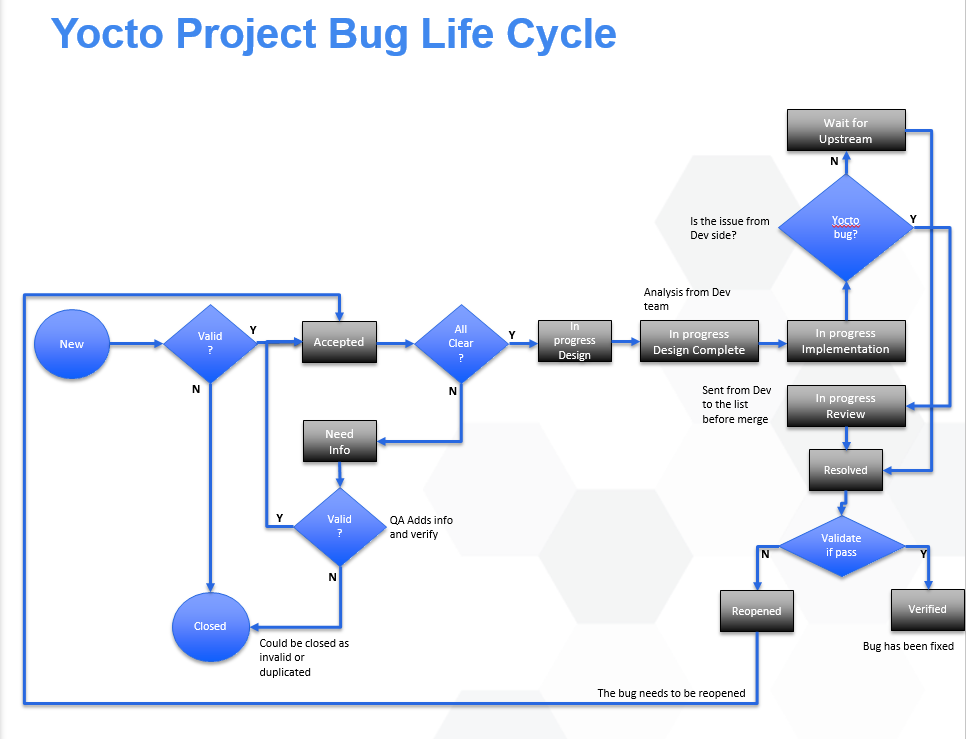
[[File:Yp_BugLifeCycle.png]] | [[File:Yp_BugLifeCycle.png]] | ||
Revision as of 20:58, 26 January 2016
Steps for BSP Automated Testing
1. Download the core-image-sato-sdk image from autobuilder( link available in the point release mail)
2. Make checkout on the poky commit from the mail (in command line):
- Clone a clean version of poky: "git clone git://git.yoctoproject.org/poky"
- In poky directory checkout on the desired commit: "$ git checkout <commit-id>"
3. Source the environment:
- In poky directory ( "cd ~/poky"): " source oe-init-build-env"
4. Edit local.conf. PATH: ~/poky/build/conf, at the en of the file adding:
- INHERIT += "testimage"
- TEST_TARGET = "simpleremote"
- TEST_TARGET_IP = "DUT ip"
- TEST_SUITES = " auto"
- Remember to add the machine for example, if genericx86 is needed, MACHINE ?= "genericx86"
5. Edit bblayers.conf, bblayers.conf PATH:~/poky/build/conf
- in " BBLAYERS ?= " \ " section add meta-selftest respecting the pattern from above
6. In ~poky/build directory, in command line, type the following commands:
- "bitbake rpm psplash" (wait for tasks to be executed)
- "bitbake package-index" (wait for tasks to be executed)
- "bitbake package-index" (wait for tasks to be executed)
NOTE: After finishing the tasks, copy the image manifest (core-image-sato-sdk-genericx86.manifest) from autobuilder at the following path: "~poky/build/tmp/deploy/images/genericx86/" ( if "/tmp/deploy/images/genericx86" does not exist create new directories with this path)
- "bitbake core-image-sato-sdk -c testimage"
If you face issues with the keys from your host, use this command: $ ssh-keygen -f /home/user/.ssh/known_hosts -R targetip
Then add the key to the host again ssh , SSH TARGETNAME@IPTARGET
Steps for LSB Automated Testing
1. In general the steps are very similar to BSP, just make sure to download the correct image and modify accordingly the machine in local.conf and path for manifest.
2. Test generic weekly LSB images (genericx86-lsb and genericx86-64-lsb):
- The #1 steps are followed for lsb images
- download the core-image-lsb-sdk image from autobuilder( link available in the point release mail)
NOTE: the images are available in sato and lsb form( access genericx86-lsb and genericx86-64-lsb directories for lsb images)
3. The checkout step is the same as BSP.
4. Edit local.conf, adding at the end the following confuguration
- The #1 steps are followed for lsb images
- Download the core-image-lsb-sdk image from autobuilder( link available in the point release mail)
NOTE: The images are available in sato and lsb form( access genericx86-lsb and genericx86-64-lsb directories for lsb images)
