Hob2 (Hob v2): Difference between revisions
No edit summary |
|||
| (2 intermediate revisions by one other user not shown) | |||
| Line 376: | Line 376: | ||
[[File:hob_review_5.JPG]] | [[File:hob_review_5.JPG]] | ||
== Hob work during the 1.4 release == | |||
This document talks about the improvements we made to Hob during the 1.3 release, and what we need to work on during 1.4 from a user interface design point of view. | |||
It is a good place to start if you will be designing or developing for Hob during the 1.4 release. | |||
[[File:GTK_Hob_moving_to_1.4.pdf]] | |||
== Try and play with Web Hob demo == | == Try and play with Web Hob demo == | ||
| Line 410: | Line 418: | ||
[xiaotong@lxt ~]mysql -uroot bitbake < ~/workspace/python/poky-contrib/bitbake/lib/bb/ui/django_webhob/bitbake.sql | [xiaotong@lxt ~]mysql -uroot bitbake < ~/workspace/python/poky-contrib/bitbake/lib/bb/ui/django_webhob/bitbake.sql | ||
=== '''2. | === '''2. steps to run this demo. === | ||
Start bitbake with webhob helper, the command is: bitbake 127.0.0.1:8080 -u webhob | Start bitbake with webhob helper, the command is: | ||
bitbake 127.0.0.1:8080 -u webhob | |||
Run django web server and switch the directory to 'cd bitbake/lib/bb/ui/django_webhob/', then using the command: | Run django web server and switch the directory to 'cd bitbake/lib/bb/ui/django_webhob/', then using the command: | ||
[xiaotong@lxt django_webhob] python manage.py runserver 127.0.0.1:8000 | [xiaotong@lxt django_webhob] python manage.py runserver 127.0.0.1:8000 | ||
If everything is OK. to visit http://127.0.0.1:8000, you will see the demo. | If everything is OK. to visit http://127.0.0.1:8000, you will see the demo. | ||
Any problems please contact xiaotongx.lv@intel.com. | Any problems please contact xiaotongx.lv@intel.com. | ||
Latest revision as of 16:34, 30 October 2012
This page holds the history for Hob v2 design and implementation.
Requirements
See slides attached. File:HOB WEB architecture overview v0.7.pdf
0. Register(?) / To support guest user?
1. Login (User authentication)
2. When user logs in
  a. History
  b. Re-estiblished previous build session
  c. Start from previous successfully built image (history: max 5)
     i) Ask user to save it as a template when build is successful
     ii) Manage saved templates (delete)
  d. Start from previous successful steps which does not have build yet (history: max 5)
3. Build settings (advaced settings, layers, machines)
4. Parse recipes
  a. User can stop the process of parsing recipes and then select another machine
  b. Progress bar
  c. An error dialog pops up and then user will be brought back to 3.
5. Select base image
  a. Create own?
  5.1 Build w/o any customization -> go to build complete directly
  5.2 Add more recipes on base images (Select recipes), then build package(6) and then go to 7
  5.3 View package (will pop up a warning dialog explaing the current available pkgs are not a complete pkg list, and then ask user if he wants to proceed or not)
      5.3.1 Yes - Then build selected recipes(6) and then go to 7
      5.3.2 No - Then go to 7 directly
  5.4 Build packages(6) directly and then go to 7
6. Build packages
  a. User can stop the process of building packages and simply stop at the current page
  b. Progress bar
  c. An error dialog pops up and then user can choose to go to 5.
7. Select package
a. Shows selected packages and image size, and user can click on build image to go to 8.
8. Build image
  a. User can download image (URL provided)
  b. Shows errors when occurred
Multi-users support 1. Reserve available bitbake for new user's request
2. When bitbake are all reserved
  a. Randomly select one bitbake server for user's configuration
  a. Submitted build request with build configuration into the build queue and the server will notify the user when build is completed (image URL or build failure with logs)
3. How to prefetch build configuration in web server
Related Bugs
- http://bugzilla.pokylinux.org/show_bug.cgi?id=1588
- http://bugzilla.pokylinux.org/show_bug.cgi?id=1688
- http://bugzilla.pokylinux.org/show_bug.cgi?id=1573
- http://bugzilla.pokylinux.org/show_bug.cgi?id=1691
- http://bugzilla.pokylinux.org/show_bug.cgi?id=991
- http://bugzilla.pokylinux.org/show_bug.cgi?id=1241
- http://bugzilla.pokylinux.org/show_bug.cgi?id=1272
- http://bugzilla.pokylinux.org/show_bug.cgi?id=1303
- http://bugzilla.pokylinux.org/show_bug.cgi?id=1450
- http://bugzilla.pokylinux.org/show_bug.cgi?id=1572
- http://bugzilla.pokylinux.org/show_bug.cgi?id=1581
- http://bugzilla.pokylinux.org/show_bug.cgi?id=1221
- http://bugzilla.pokylinux.org/show_bug.cgi?id=1277
- http://bugzilla.pokylinux.org/show_bug.cgi?id=1742
- http://bugzilla.pokylinux.org/show_bug.cgi?id=1743
- http://bugzilla.pokylinux.org/show_bug.cgi?id=1744
- http://bugzilla.pokylinux.org/show_bug.cgi?id=1745
- http://bugzilla.pokylinux.org/show_bug.cgi?id=1746
- http://bugzilla.pokylinux.org/show_bug.cgi?id=1747
- http://bugzilla.pokylinux.org/show_bug.cgi?id=1748
- http://bugzilla.pokylinux.org/show_bug.cgi?id=1749
- http://bugzilla.pokylinux.org/show_bug.cgi?id=1750
- http://bugzilla.pokylinux.org/show_bug.cgi?id=1751
- http://bugzilla.pokylinux.org/show_bug.cgi?id=1752
- http://bugzilla.pokylinux.org/show_bug.cgi?id=1753
Discussion 1 (Lianhao, Ke, Dongxiao and Shane)
In order to get the accurate dependencies of the packages to be installed into a rootfs image, the hob v2 works in a 2-stages way: In stage 1, the users select the recipes which would be built to generate packages; In stage 2, the users select the packages which would be installed into the final rootfs image. The hob v2 will present the UI to the users in the form of a step-by-step wizard. Here is the main workflow:
Step 1: Users are asked to specify which layers(directories) should be included.
- TP1: Hob would check for the validity of the file conf/layer.conf to make sure the user input is a valid layer.
[P1][D5]http://bugzilla.pokylinux.org/show_bug.cgi?id=1742
Step 2: Users are asked to select various configurations, i.e. machine, distro, package format, image output type, etc.
- TP2: bitbake backend will then parse the configuration files and all the available recipes based on user's configuration.
[P1][D5]http://bugzilla.pokylinux.org/show_bug.cgi?id=1743
Step 3: Users are asked to select the recipes which will be built later to generate the packages. In this step, the users may select the recipes from scratch or select the recipes from the pre-defined base image templates, e.g. core-image-sato, core-image-minimal, etc.
- TP3: Hob frontend needs the information of all the available recipes, e.g. PN, license, description, section, etc.
[P1][D5]http://bugzilla.pokylinux.org/show_bug.cgi?id=1745
- TP4: Hob frontend needs to know the build dependencies between the recipes. Say recipe A has a build dependency on recipe B, if the users select recipe A, recipe B should also be automatically selected. Without deselecting recipe A, the users can NOT deselect recipe B only. If the users deselect recipe A, the recipe B will still remain selected.
[P1][D10]http://bugzilla.pokylinux.org/show_bug.cgi?id=1747
- TP5: bitbake backend needs to be able to generate the recipe dependencies quick enough so the Hob frontend UI won't wait too long.
[P1][TBD]http://bugzilla.pokylinux.org/show_bug.cgi?id=1749
Step 4: After the users select all the recipes they want to build and click "Next", bitbake will build them. This may take quite a long time if those recipes have never been built or if there is no sstate. During that time, the building log will be displayed in the hob UI along with the progress bar. The users may choose to cancel the build if they want.
- TP6: A progress bar should tell the users how much left for the building.
[P1][D3]http://bugzilla.pokylinux.org/show_bug.cgi?id=1751
Step 5: After all recipes are built successfully, the users will be asked to choose which packages they want to install into the final rootfs images. The available packages can be sorted by Name/Section/Size/Selected or not. The users may also be given the opportunity to configure other image options if appropriate, i.e. how much free space will be added into the final images, do we need prelink or mklibs on the final images, etc. Some packages are by default selected to be installed based on the base image template the users have chosen in step3.
- TP7: New items, i.e. package installed size, will be added into the current pkgdata.
[P1][D3]http://bugzilla.pokylinux.org/show_bug.cgi?id=1748
- TP8: Need to develop a new bitbake task to collect all the pkgdata information and send these information back to Hob UI frontend
[P1][D5]http://bugzilla.pokylinux.org/show_bug.cgi?id=1750
- TP9: Hob UI frontend will use the information generated in TP8 to build a reference count based tree model about the packages dependencies. This tree model helps the users to figure out what actually will be installed into the final rootfs images.
[P1][D15]http://bugzilla.pokylinux.org/show_bug.cgi?id=1752
- TP10: Hob UI needs to write a temporary recipe and reparse that recipes to build the final images.
[P1][D3]http://bugzilla.pokylinux.org/show_bug.cgi?id=1746
Other TPs: - TP11: users should be able to load/save their configurations, choices of recipes and/or packages.
[P1][D3]http://bugzilla.pokylinux.org/show_bug.cgi?id=1744
Open Issues(OI): - OI1: For TP5, we need to investigate whether the bitbake backend can generate the accurate recipe build dependencies using only cache data and taskData, without calling prepare_run_queue() which would take quite a long time because it will generate all the task dependencies. If not, we need to figure out a way to accelerate that process. One way is to write another special prepare_run_queue so it only process the information the hob concerns. But RP is concerned that if we have 2 kind of prepare_run_queue, we need to make sure the dependencies generated by each of them are exactly the same.
- OI2: How to handle the build dependencies of virtual targets. E.g. many recipes have build dependencies on virtual/libc, and we have both eglibc and uclibc to provide virtual/libc. Eglibc will be the default options but what if the user wants uclibc instead of eglibc. One possible way may be to treat this as part of the configuration PREPERRED_PROVIDER, and have the bitbake backend reparse the recipes based on the new configurations, but this way may take some time due to the reparsing.
[P1][TBD]http://bugzilla.pokylinux.org/show_bug.cgi?id=1753
Discussion 2 (Lianhao, Josh and Jessica)
1. It's feasible to save the UI configurations in the client side, not in the server side's conf/local.conf (Bug #1441), but there is one thing need needs special attention: the cache validity. Currently, the cache validity is decided by comparing the file modification time(See code in Cache:__init__() in cache.py). If we change the configuration in the data store but not in the server side's configuration file, that means we have to design a new way to decide the cache validity.
2. Currently, the server commands getVariable and setVariable only apply to the base configuration data store. It doesn't apply to the data store of a specific recipe. It's feasible to extend those commands, in which case we don't need to create new recipe for stage 2 building, but again need to pay attention to cache validity. Josh prefers the way to create new recipe for stage 2 building because it is simpler.
3. About OI1, Josh thinks taskData itself is not enough to generate accurate build dependencies. Josh is ok with NOT providing build dependencies in stage 1, but RP thinks we need to show that build dependencies .
AR: confirm whether we could generate correct build dependencies based on taskData only. If the answer is no, then we need to see how the lengthy operation of prepare_runqueue will influence the user experience. Is it ok with users if they're given a progress bar indicating what is going on during that period of time(more than 20 seconds I guess including the taskData, prepare_runqueue and pre-process the returned data)? If it's not acceptable, we may need to persuade RP not showing the build dependencies in stage1, at least for 1.2 version, unless we have other ways to get the dependencies in a short time.
4. About OI2, Josh thinks it's the right way to use PREPERRED_PROVIDERS as part of the configurations for multiple provider situation.
5. Josh thinks the current metadata information in the recipe may not be sufficient for hob use. He prefers to add more metadata into the recipe. I raised the question of whether the community is willing to accept it, Josh thinks we should do that work for the recipes we own, just like the distro tracking data we added.
6. Jessica/Josh mentioned that we should keep extensibility in our minds during HobV2 design, since we already got comment from community saying that they want to add more configurations in stage 2 building. I mentioned about the idea of having a configuration file for the configurable items in HobV2. Josh mentioned there is already some kind of mechanism in bitbake which would be a good start point for us(See commit 4921fda5b3a18c797acd267f2b1179ac032cd42).
7. Jessica thinks we kind of need to demo the Hobv2 skeleton UI at the end of M1(Bug #1764). There will be a person in UK helping us with the UX design, Dave suggest this "artist" thought might change our engineer mindset.
8. Jessica suggests that we need to do the split between client/server in 1.2, in an evolutionary way that Hobv2 uses the modal of client/server split, while other UI may continue to use the modal of client/server on the same machine.
UI Skelecton
<That is based on our previous discussions (esp. discussion 1) and just for review, the UI design and layout could be changed and polished, some details could be determined later>
1. Main Window
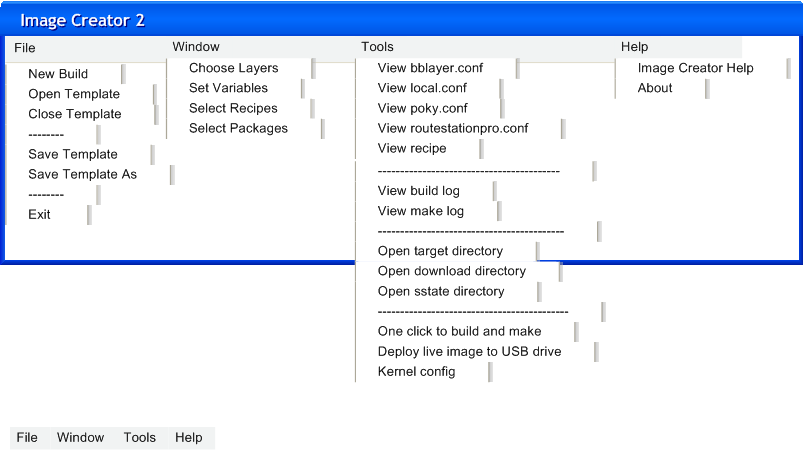
Here is the main window with menus.
"New Build" is to reset the process to the initial state to start a new build process.
"Open Template" is to load a hob-specific file saved last time, which includes setting, recipes, and packages. What does template look like? (TBD)
"Close Template" is just to close the current process, discard any change to the template file.
"Save Template" is to save the changes of the template file.
"Save Template As" is to save the changes to another template file. A file save dialog is shown.
"Exit" is to exit the program.
The items under "Window" are to switch to any step from any step.
The "View" items under "Tools" are to view different files and logs.
The "Open" items are to open different directories. It is worth noting that "Open target directory" is useful after the target image is made.
"One click to build and make" is that the user doesn't want to click "Next >" one by one, but load his/her template, use all settings in the template file and click this to make the target image.
"Deploy live image to USB drive" is to make a live image based on the image made.
"Kernel config" is to run "menu config" in the kernel for kernel customization. (TBD)
The menus under “Help” are to show help hints, files and copyright information.
2. Step 1: Configurations and Settings
Here is step 1, to choose layers, and set some common configuration values for .conf files. Those variables are not precise and TBD. We need some time to figure out which parameters should be common enough to be put in this page. Or, figure out some and add more incrementally.
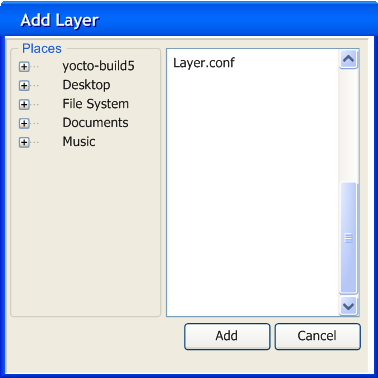
Users can pick up more layers by clicking "Add Layer". After clicking "Add Layer", a new window is open.
It is the same window as FileChooserDialog hob1 used.
After the user clicks "Add", a new layer will be added into and its validity is checked, if it is not valid, an error window will be shown.
The user also can remove a layer by selecting a line and clicking "Remove". The removed line (layer) will disappear rather than stay there and be disabled.
If the user adds more layer, the availabe values for the following variables like machine, might be changed. Ditto for removing layer.
For DL_DIR etc., when the user clicks "Open", FileChooserDialog is shown.
At this stage, the user can click "Open Template" to load an existing hob-specific template saved last time. After loading, all variables in the window are set automatically. So are those in the other windows such as recipes and packages selected, but they will be shown later.
Note: the values will be set back to the conf file and sent to bitbake server as well. Bitbake server will never to read the values from the conf files again.
Note: if the user loads a template saved before, the values on this page probably are automatically set per the template file but the user can change in individual pages later.
If the user is an advanced user who is familiar with bitbake and not satisfied with those we summarize, he/she can go to the advanced window by clicking "Advanced".Here we need to figure out all configuration variables which can be set by users and put them to this "advanced" page. When the user hopes to discard the changes and reset the default values, he/she can click "Reset Default". If the user clicks "Close", all changes will be saved and hob2 will return to the above window of step 1. If the user clicks "Cancel", it indicates that all changes are discarded, and the window is closed and returned to the above window of step 1.
In the above window of step 1, the user can reset to the initial state (i.e. the state right after hob2 is opened) by clicking "Cancel".
If the user clicks "Build and Make >>", it indicates that the user will use all settings in the template file and don't want do step by step but to make image immediately.
If the user clicks “Next >”, the validity of all variables is verified, and those values are saved back the local files and sent to bitbake server directly. Now we are going to the next window.
3. Waiting...
A progress bar is shown. (about 1 minute)
4. Step 2: Select Recipes
The window for this step looks like
Note: if the user loads a template saved before, the recipes on this page probably are automatically selected per the template file but the user can change. (mentioned early)
The user can choose to build from the scratch ("No Base Image"), or from the base image ("core-image-sato", "core-image-minimal", etc.)
If the user chooses the latter, the backend server will parse which recipes are in the base image, and select them in the grid automatically.
Again, the recipes brought by the build dependency are also checked, when a recipe is selected no matter whether it is checked by user manually or checked by the base image. At the same time, its build dependencies are also shown at the bottom of the window.
The "Details" shows the detail of a recipe, if the user selects a line (recipe).
If the user clicks "< Back", it will go back to the previous window.
If the user clicks "Build >", it will start to build those recipes into packages after verifying user’s input.
If the user clicks "Build and Make >>", it indicates that the user will use all settings in the template file and don't want do step by step but to make image immediately.
If the user clicks "Cancel", it will go to the initial state of hob2.
Note: in order to avoid frequent clicks/selections for the user on the next page (package selection), in this page hob2 will remember which recipes are brought by other recipes, and which recipes are chosen by the user. For the latter, on the page of package selection, those packages, which are generated by those recipes, are selected automatically. If the user doesn’t want them to be made into the target image, the user can deselect them but that will rarely happen.
5. Waiting: Building Packages
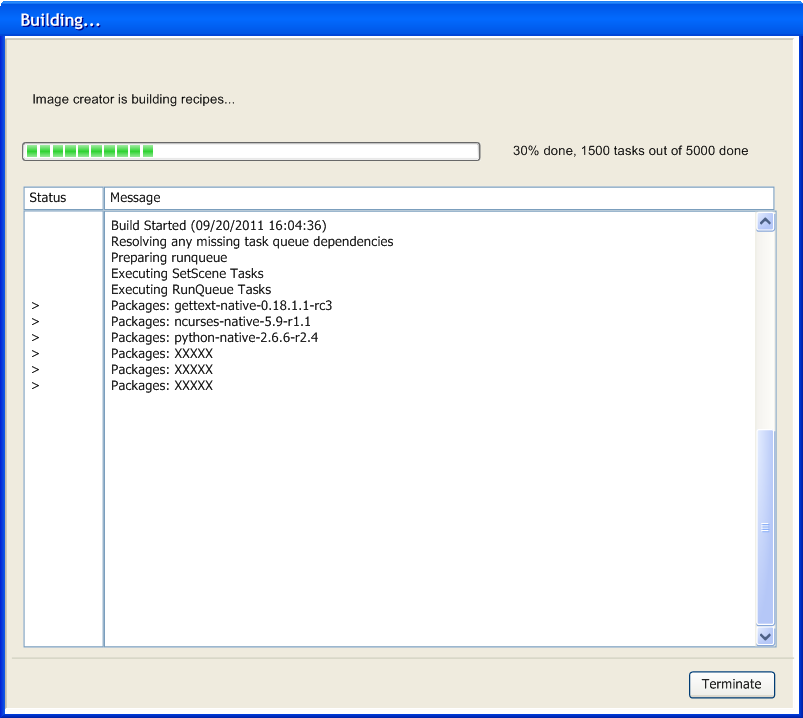
During the build, the window is changed into the following page:
That is similar to the previous hob, except that we add a progress bar to show how many tasks are done and how many left.
If the user clicks "Terminate", hob2 is reset to the initial state.
6. Step 3: Select Packages
After the build is done, hob2 comes to the following page:
Note: if the user loads a template saved before, the packages on this page probably are automatically selected per the template file but the user can change.
We could add our algorithm for reference count into this page. And the user is allowed to deselect the packages. According to the algorithm, some packages related to rdepends will be deselected as well. Again, the size of each package, and the total size of the image are shown in that page.
When the user selects and deselects several times, a package probably is in dangling state. In that case, we will mark the line as "special" (in red, say).
If the user clicks "Save Template As", all settings, recipes and packages will be saved for the use of next time.
If the user clicks "Make", hob2 will start to make the target image based on user’s selection after verifying user’s input.
If the user clicks "Cancel", hob2 will go to the initial state.
Note: Task related recipes (e.g. Task-core-boot) can put into this page. Like hob1's package collection.
7. Waiting: Making Image
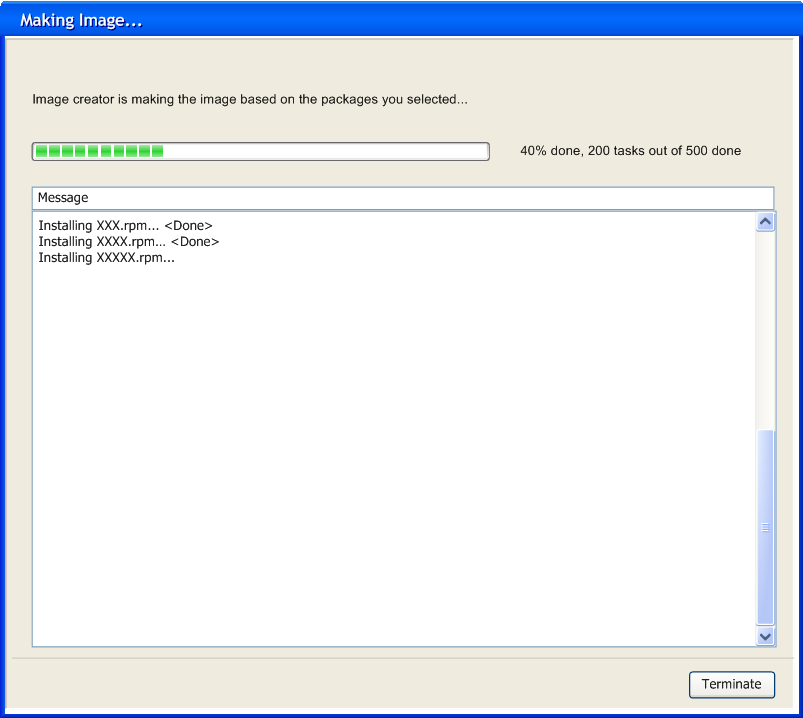
When making the image, hob2 will shows the following page, which is similar as the "building" page.
If the user clicks "Terminate", hob2 will go to the initial state.
If the image is made, a message will be shown to tell the user where to get the image. The user also can click "Open target directory" in the menu to find it later.
Interaction design proposal for Hob 1.2
A couple of videos showing some high-level design ideas for the Hob 1.2
A detailed design document describing the Settings dialogue for Hob 1.2
File:Settings-dialogue-design-spec-v1.1.pdf
A detailed design document describing what happens when the building process fails
Visual design proposal for Hob 1.2
This document shows the proposed visual design for Hob 1.2
File:Yocto - HOB image creator -visual design-v1.1.pdf
This document lists all screens and dialogues in Hob 1.2, showing both interaction and visual design side by side. Still not fully complete (work in progress)
File:Hob 1.2 screens inventory.pdf
Trial of latest Hob2
The current Hob 2 is not checked into master branch yet, it stores at http://git.yoctoproject.org/cgit/cgit.cgi/poky-contrib/log/?h=dxu4/hob2-v0.12
If you want to try the new Hob, follow the instructions below:
# git clone git://git.pokylinux.org/poky-contrib
# cd poky-contrib
# git checkout remotes/origin/dxu4/hob2-v0.12 -b hob2-v0.12
# source oe-init-build-env
# hob
After the pseudo-native is built out, you will see the hob screen.
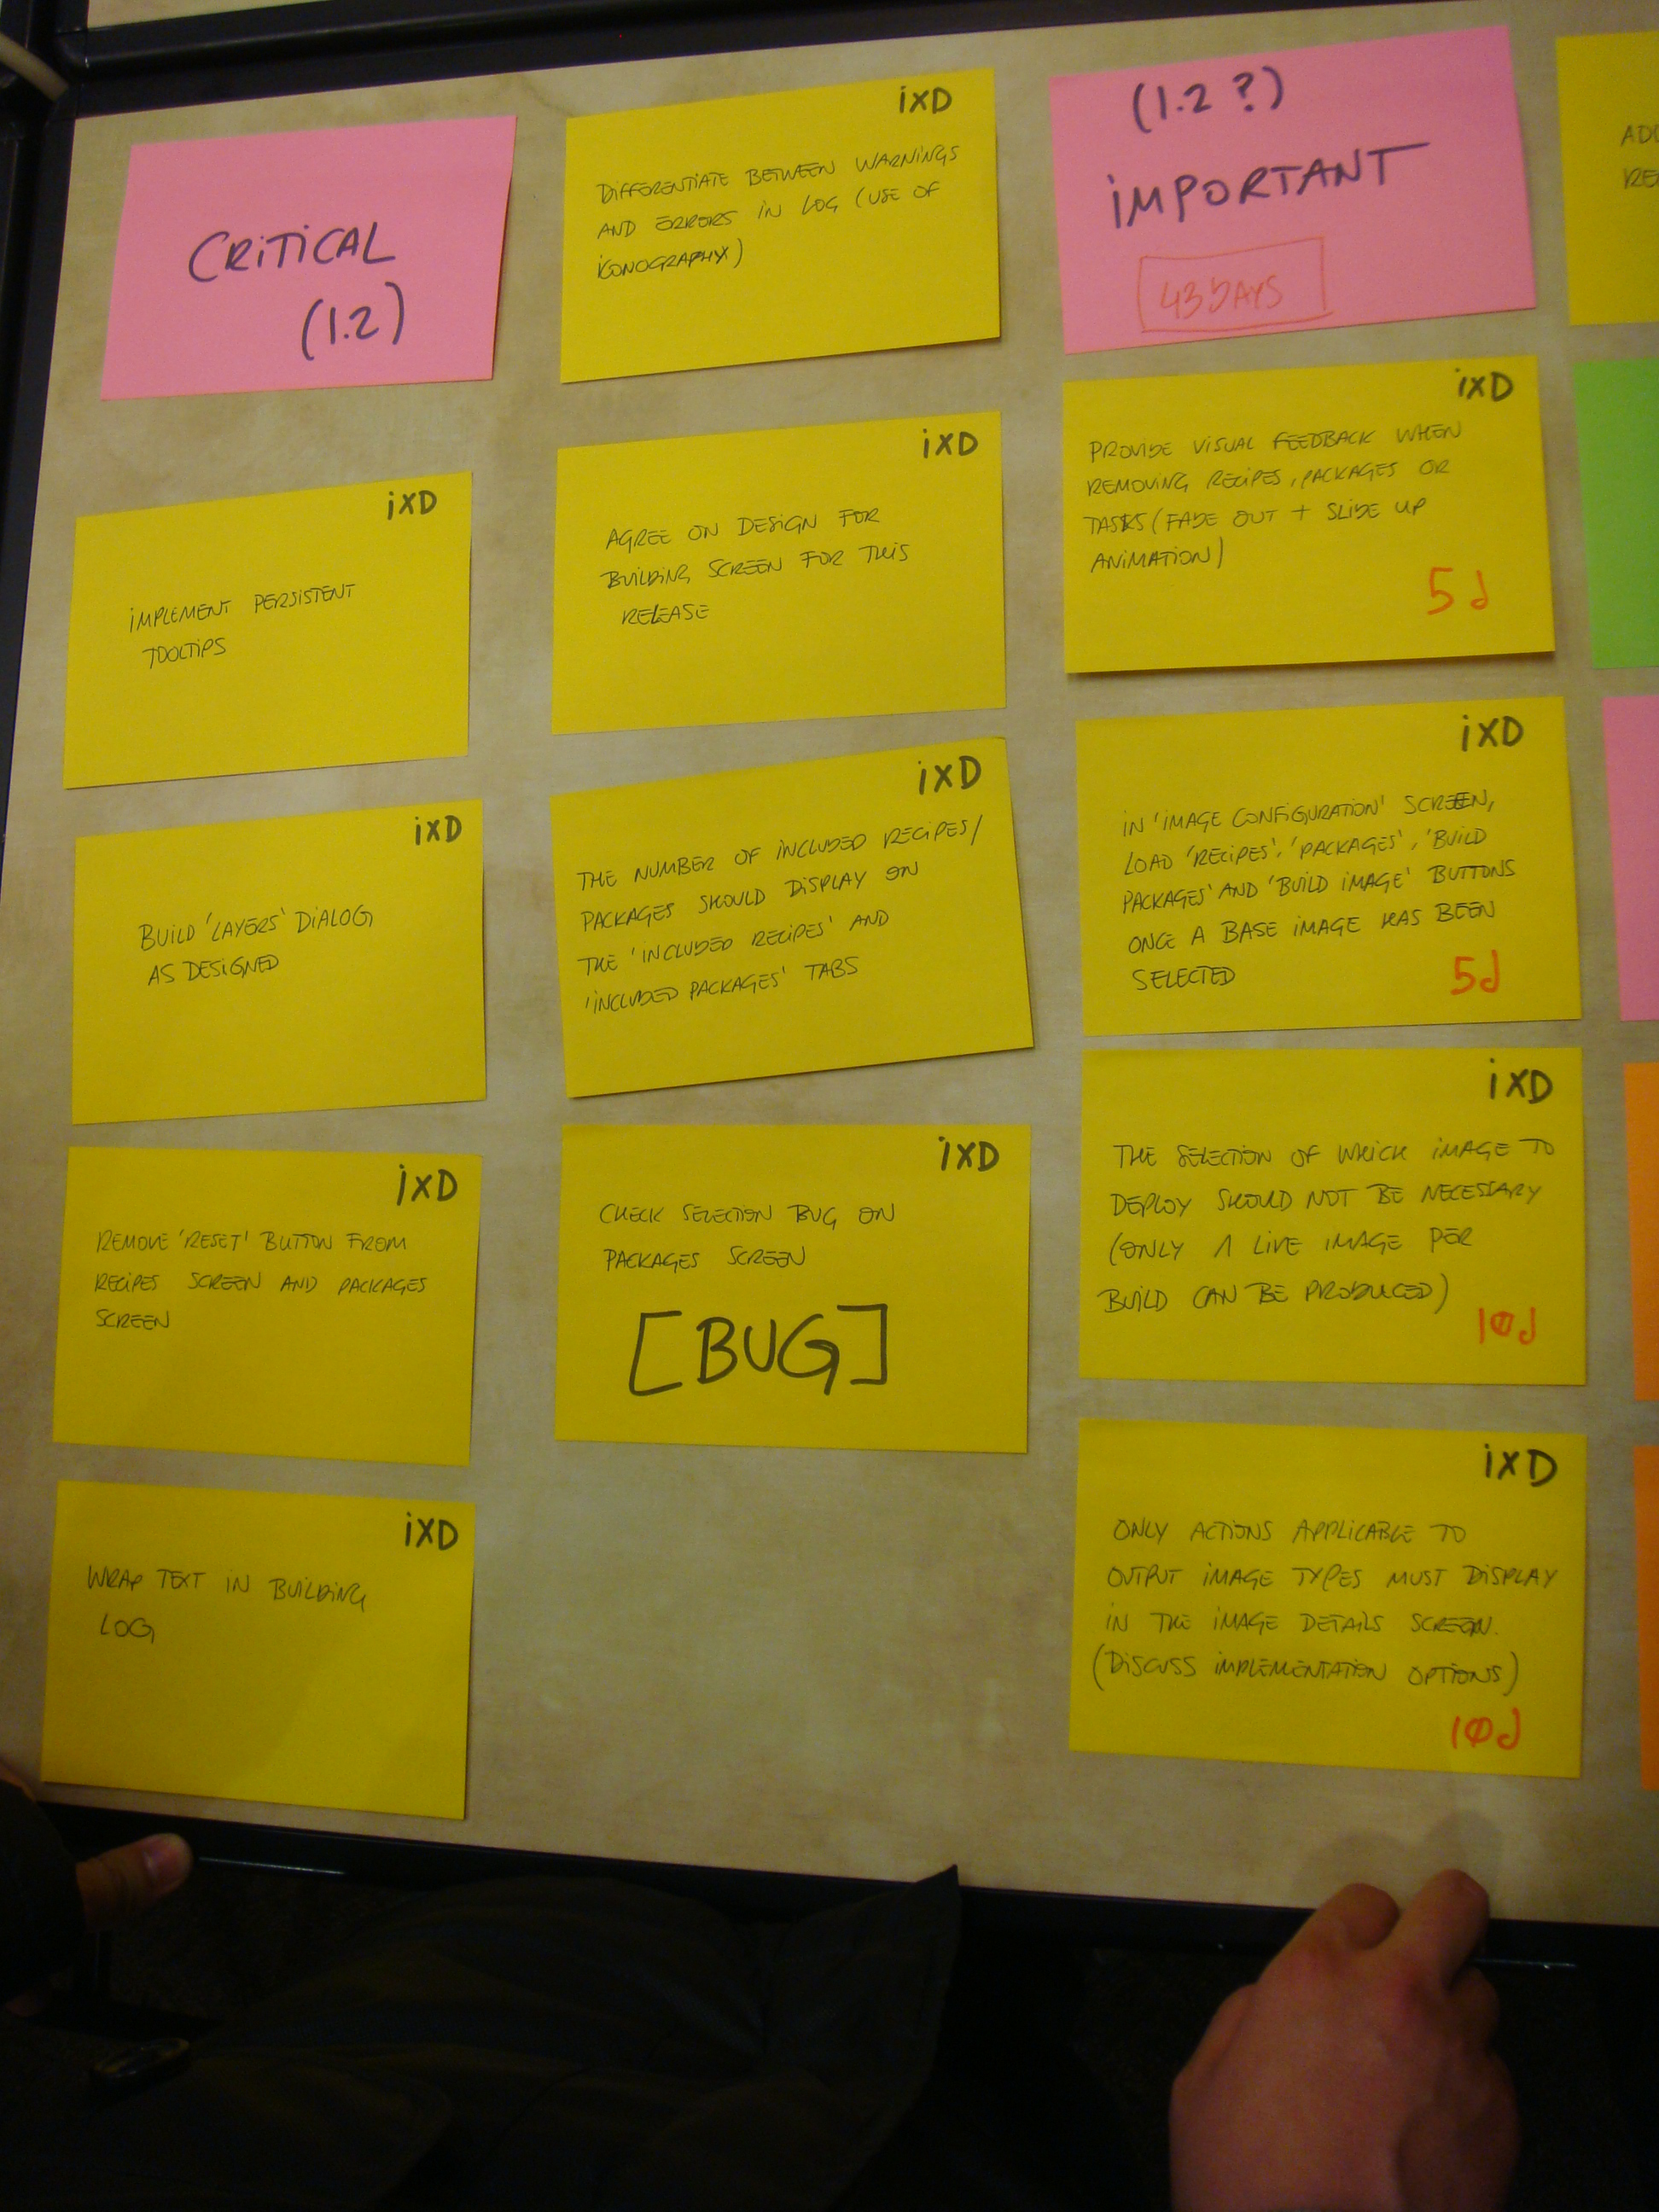
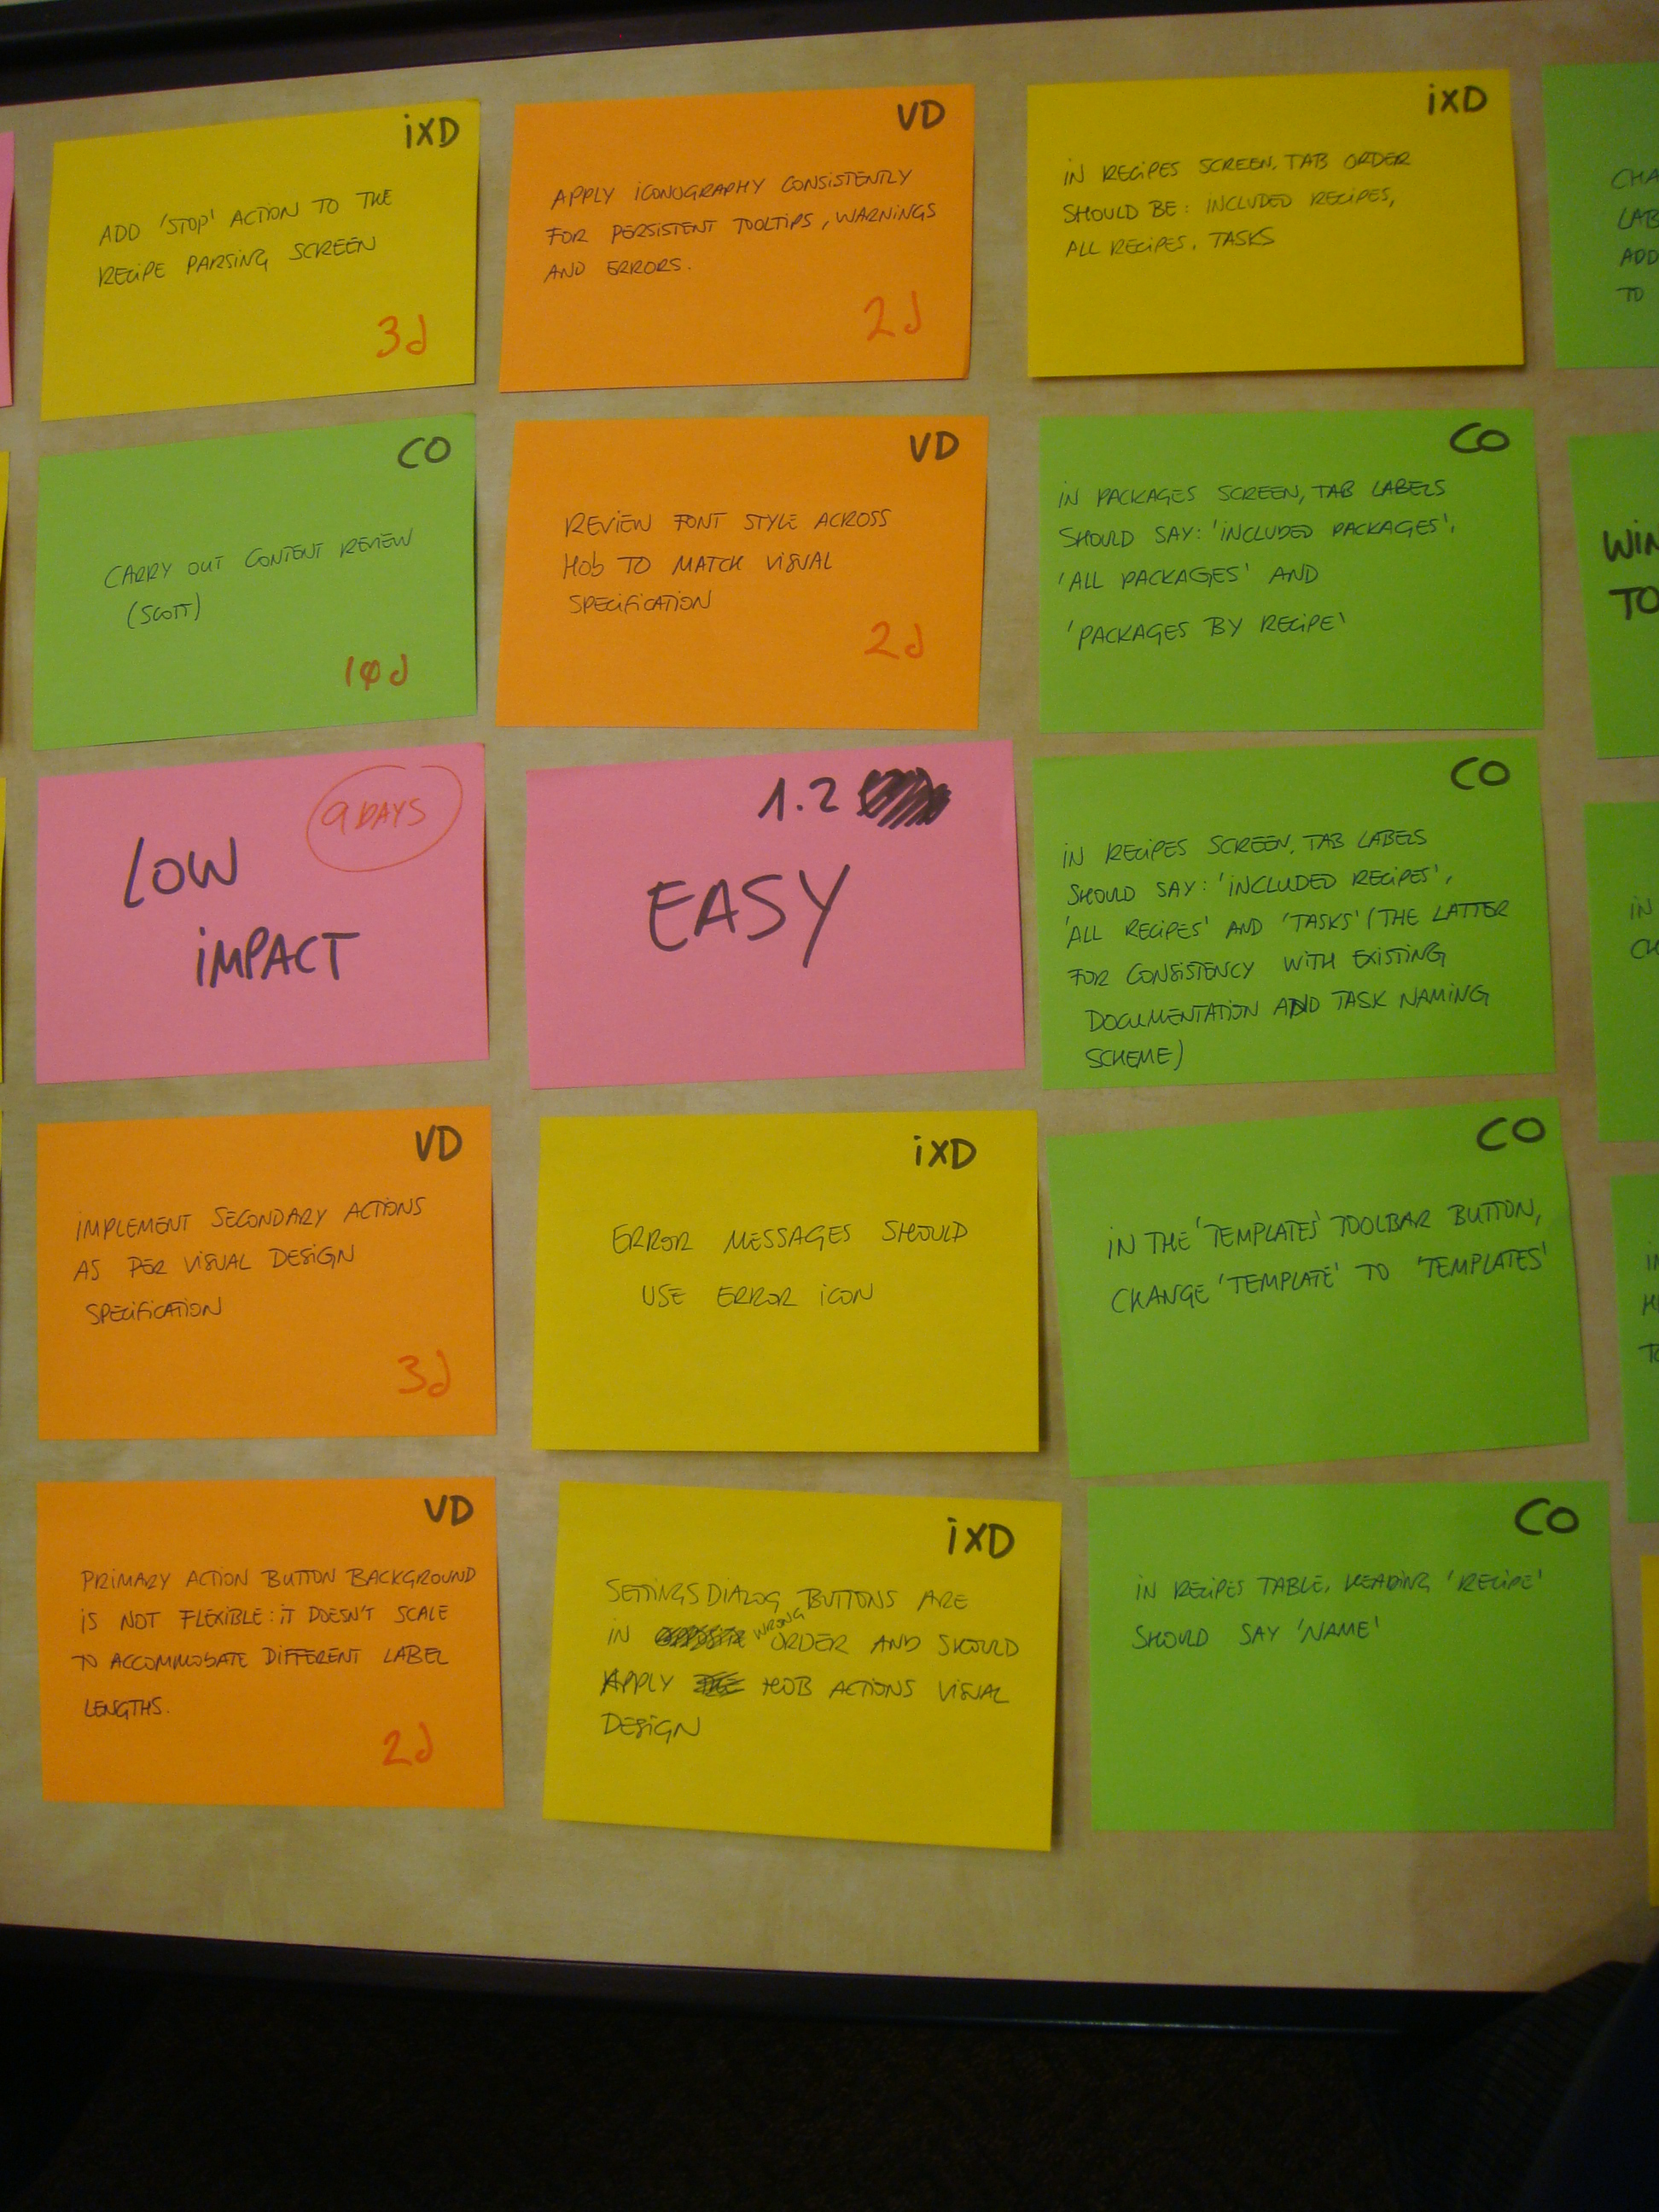
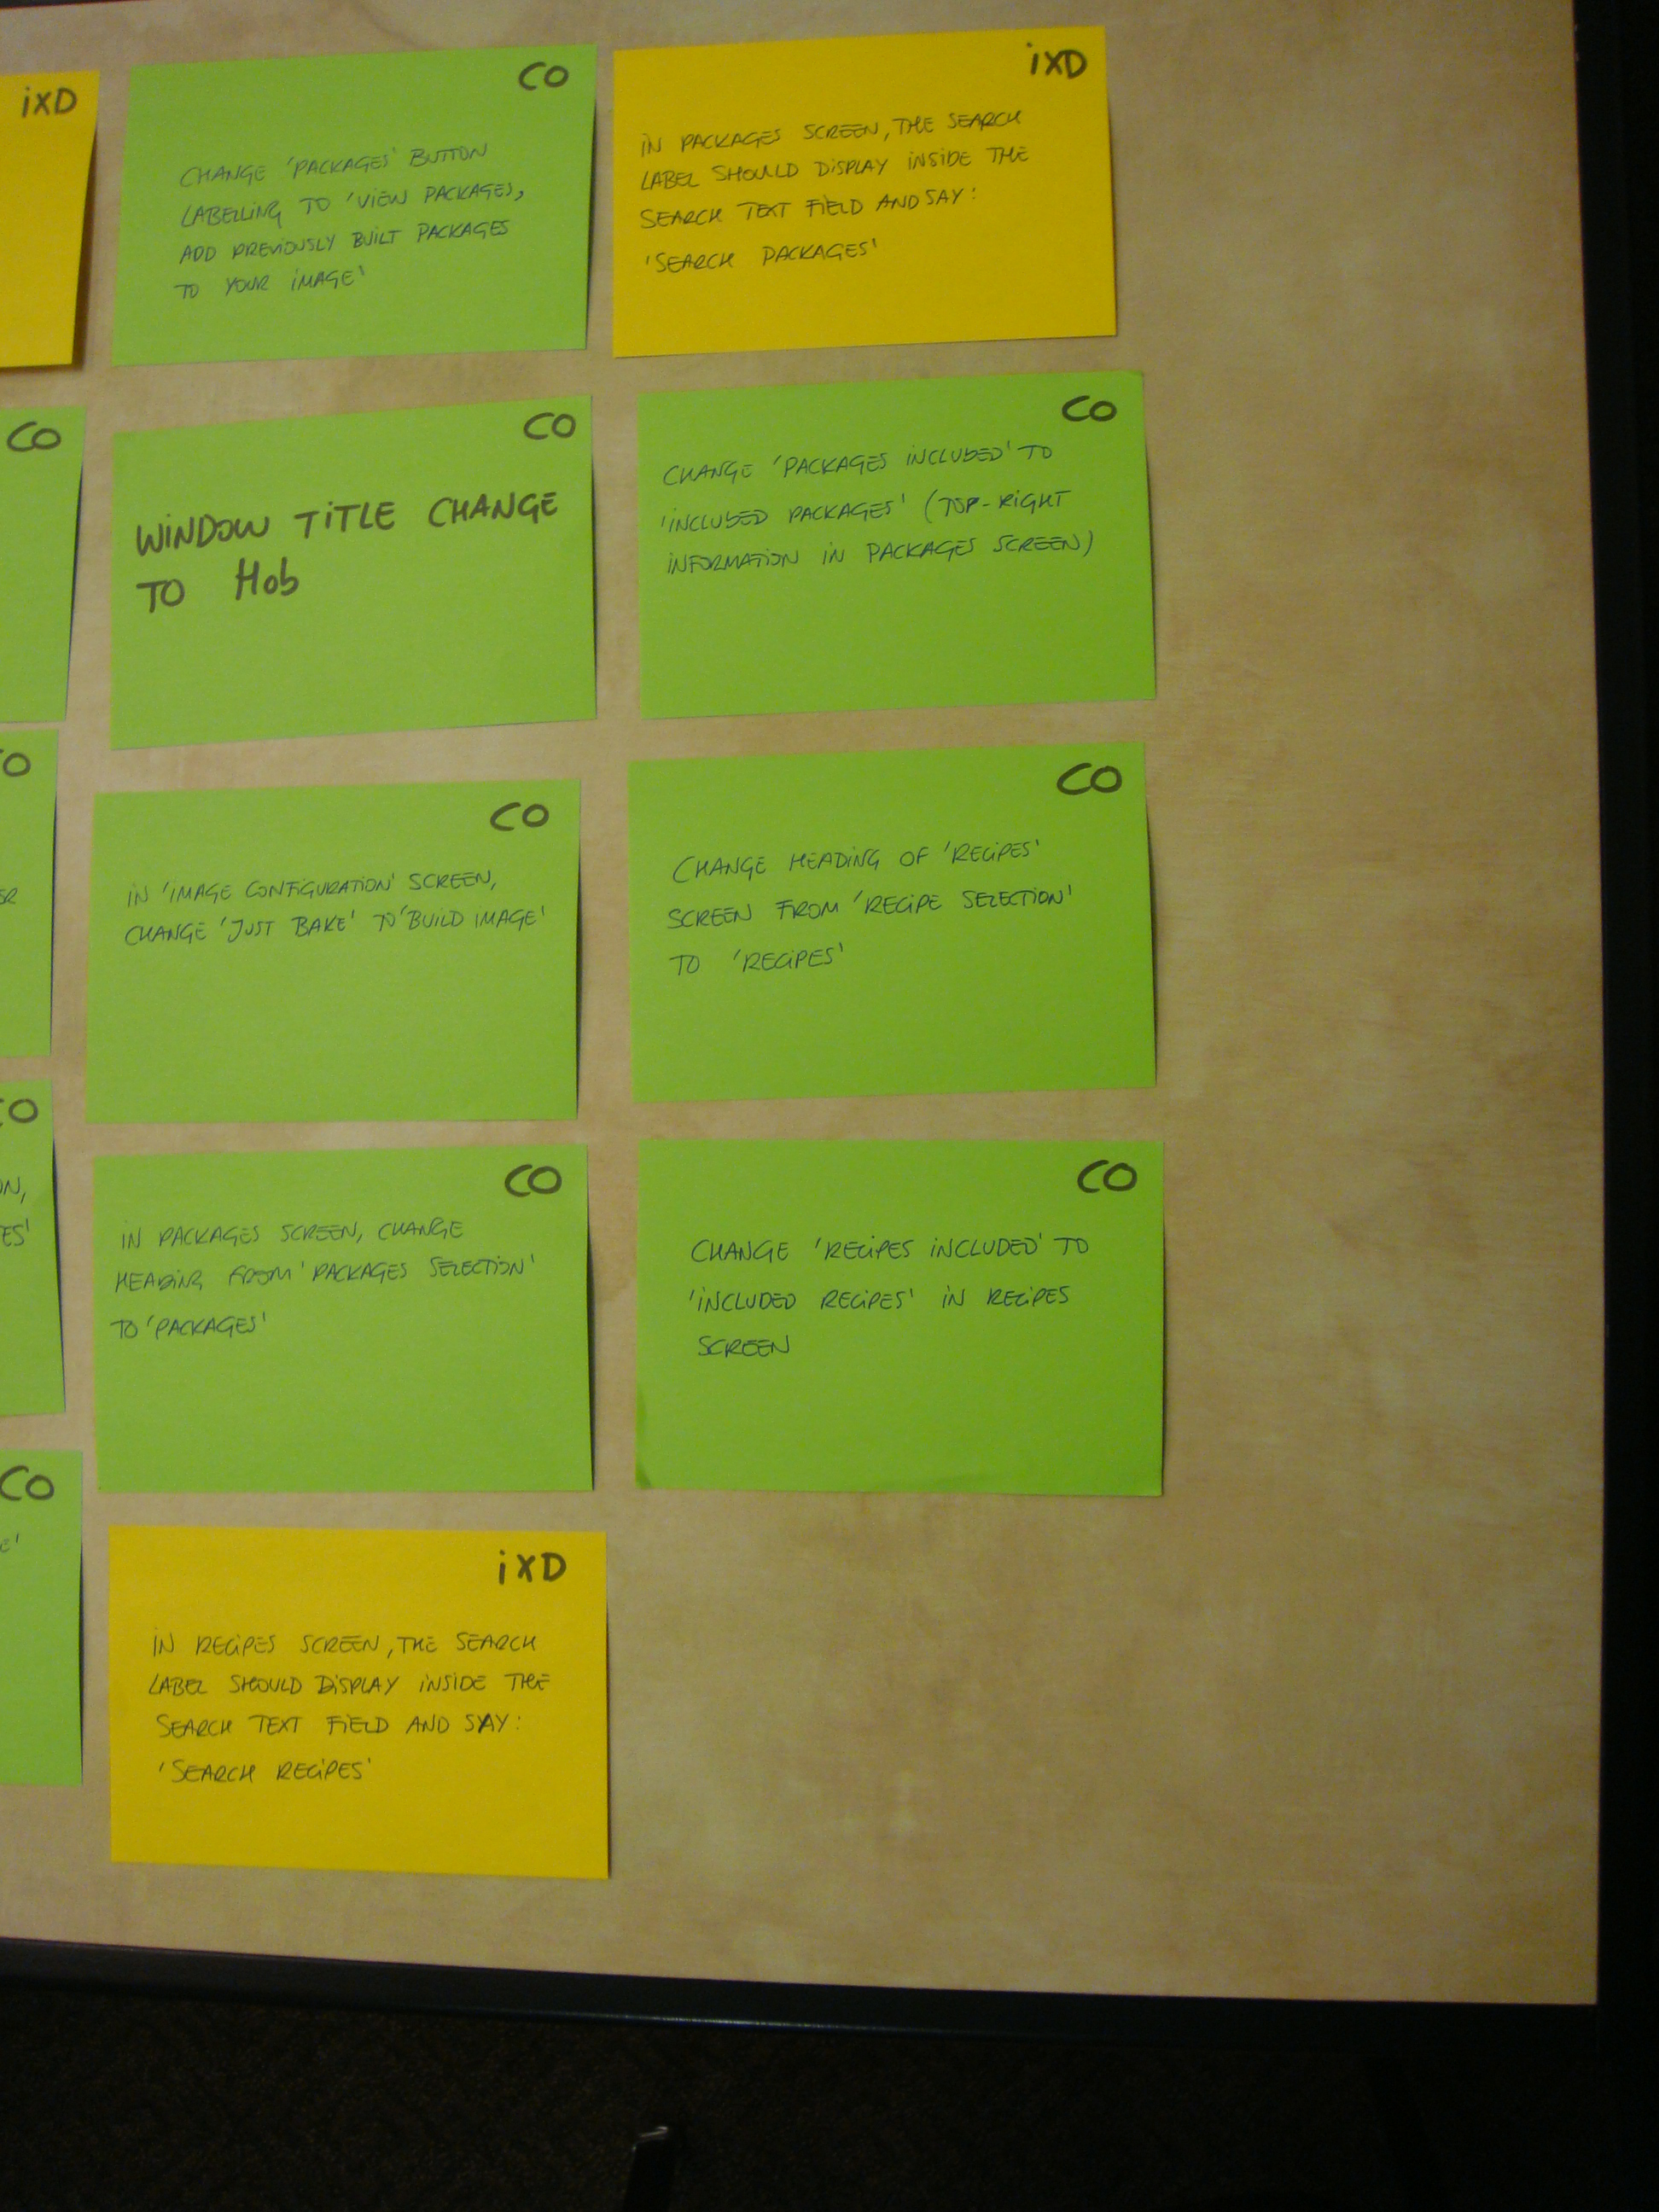
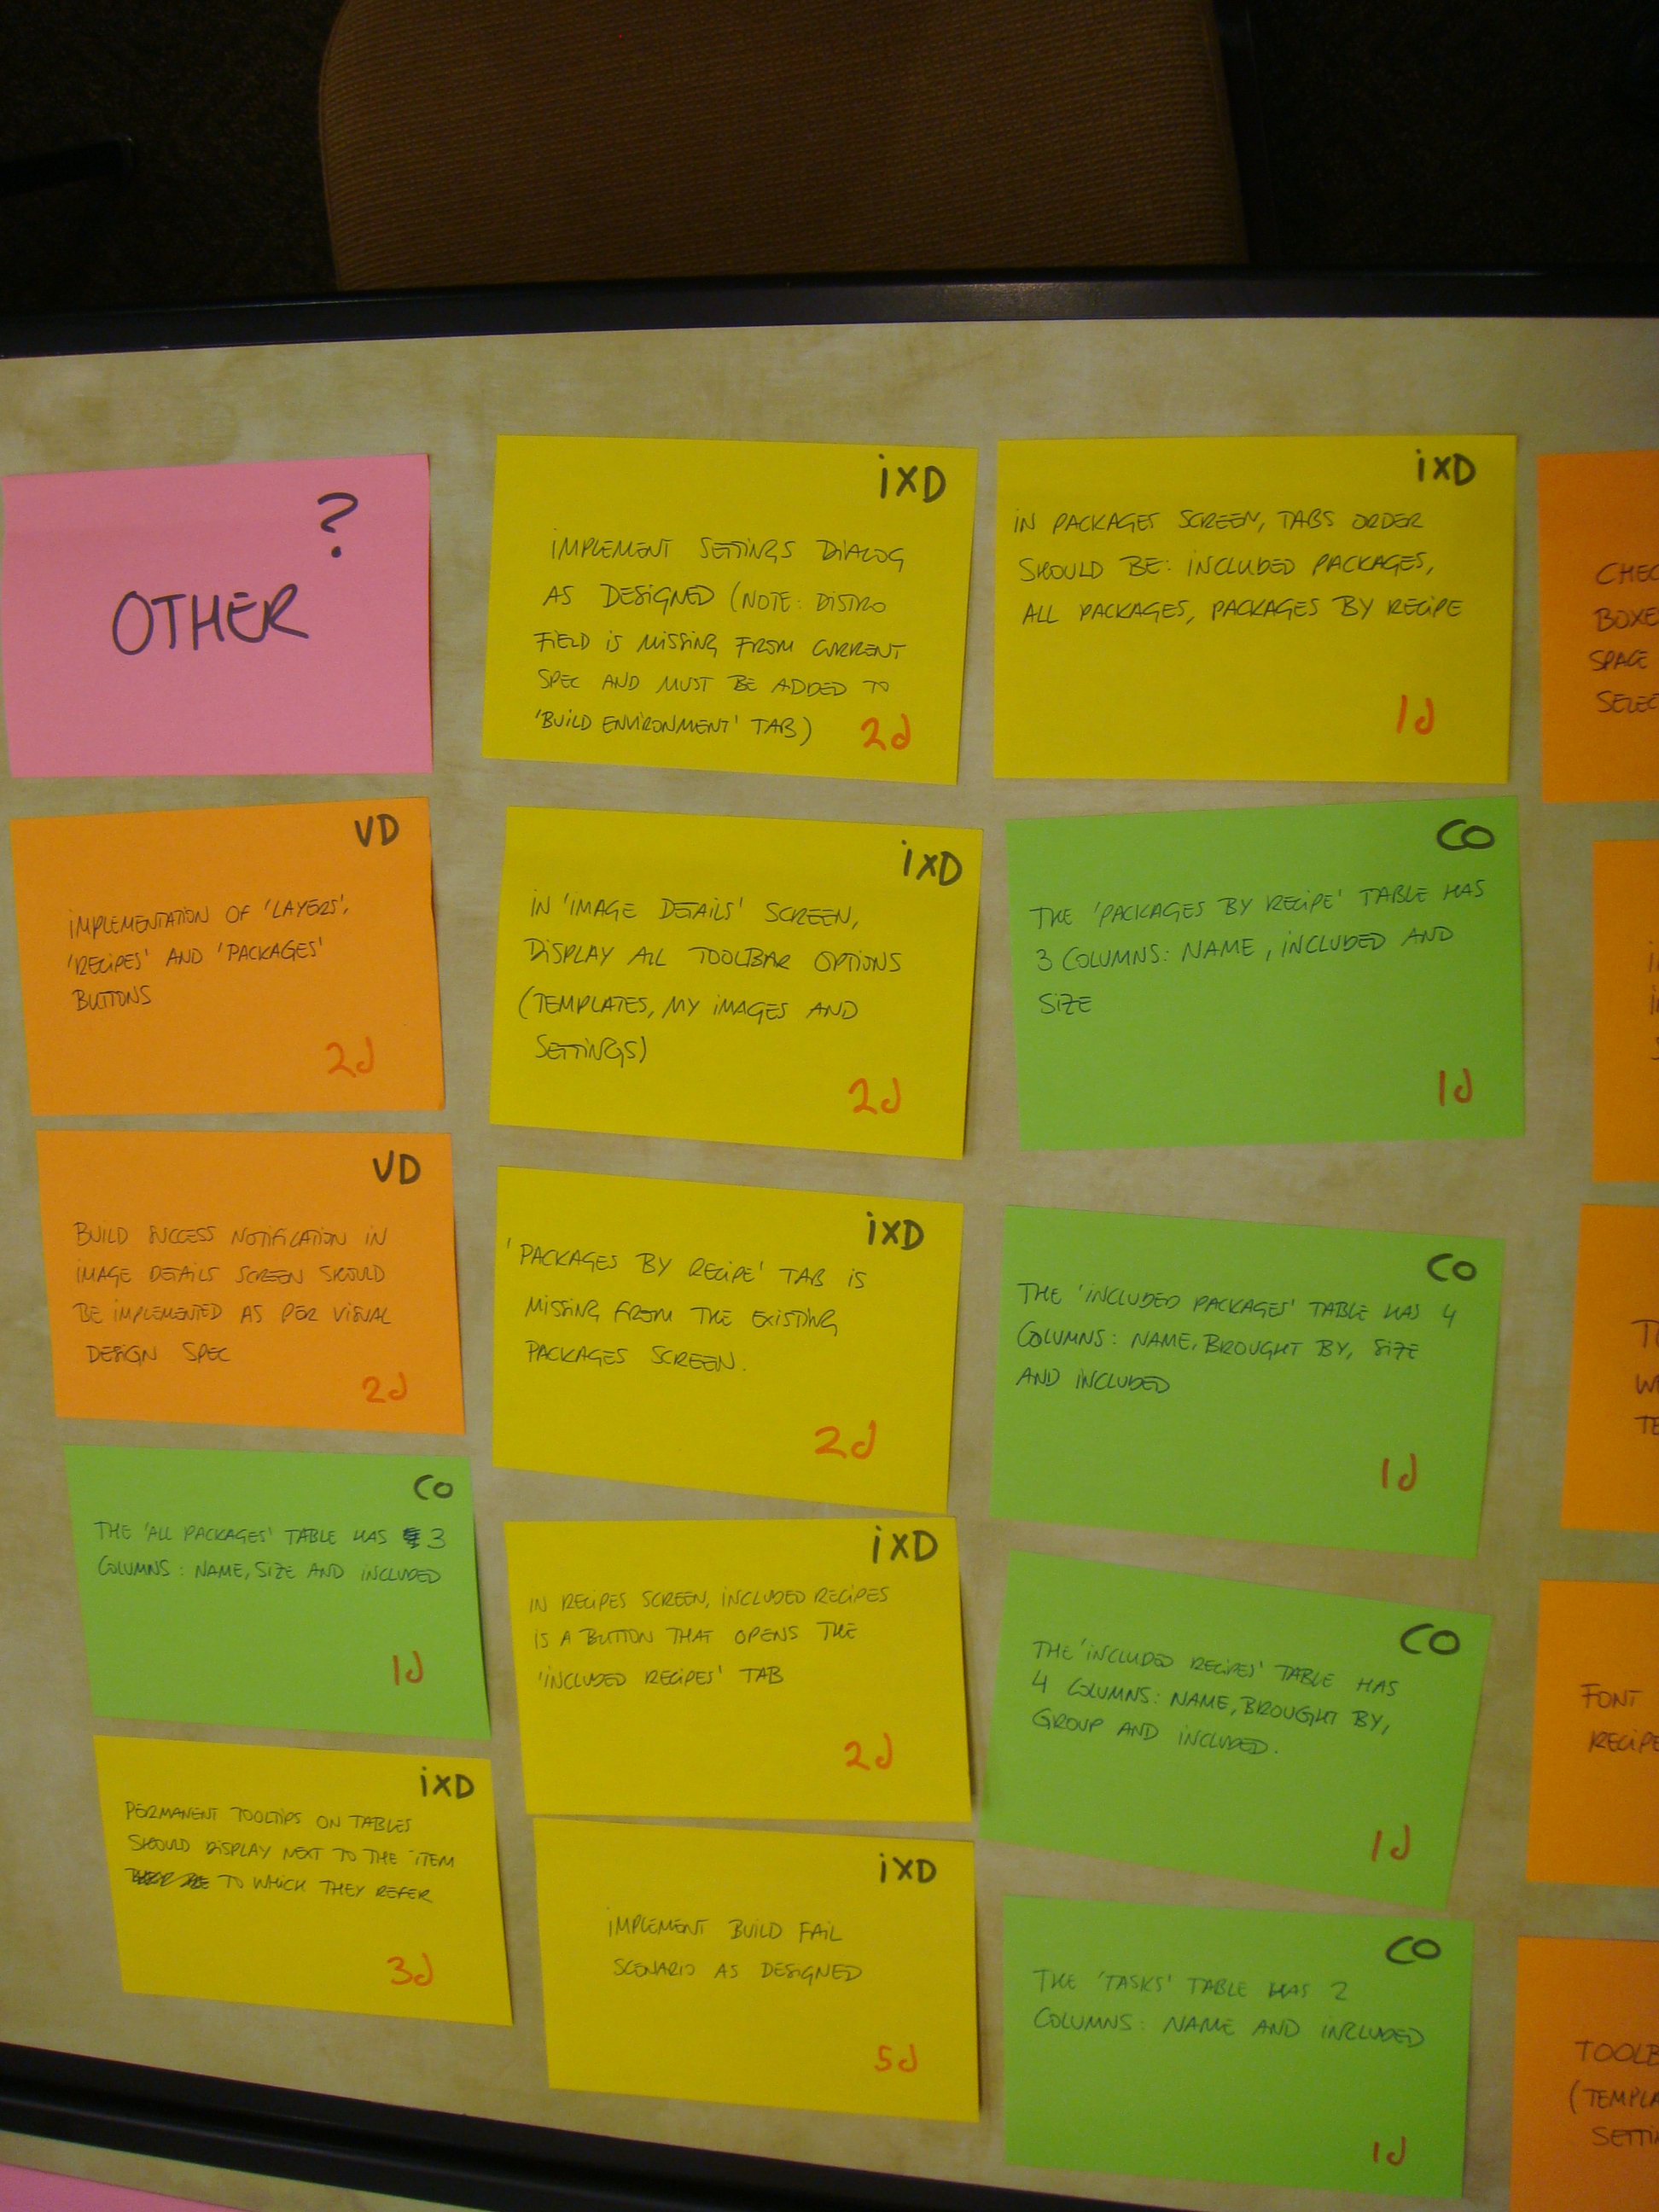
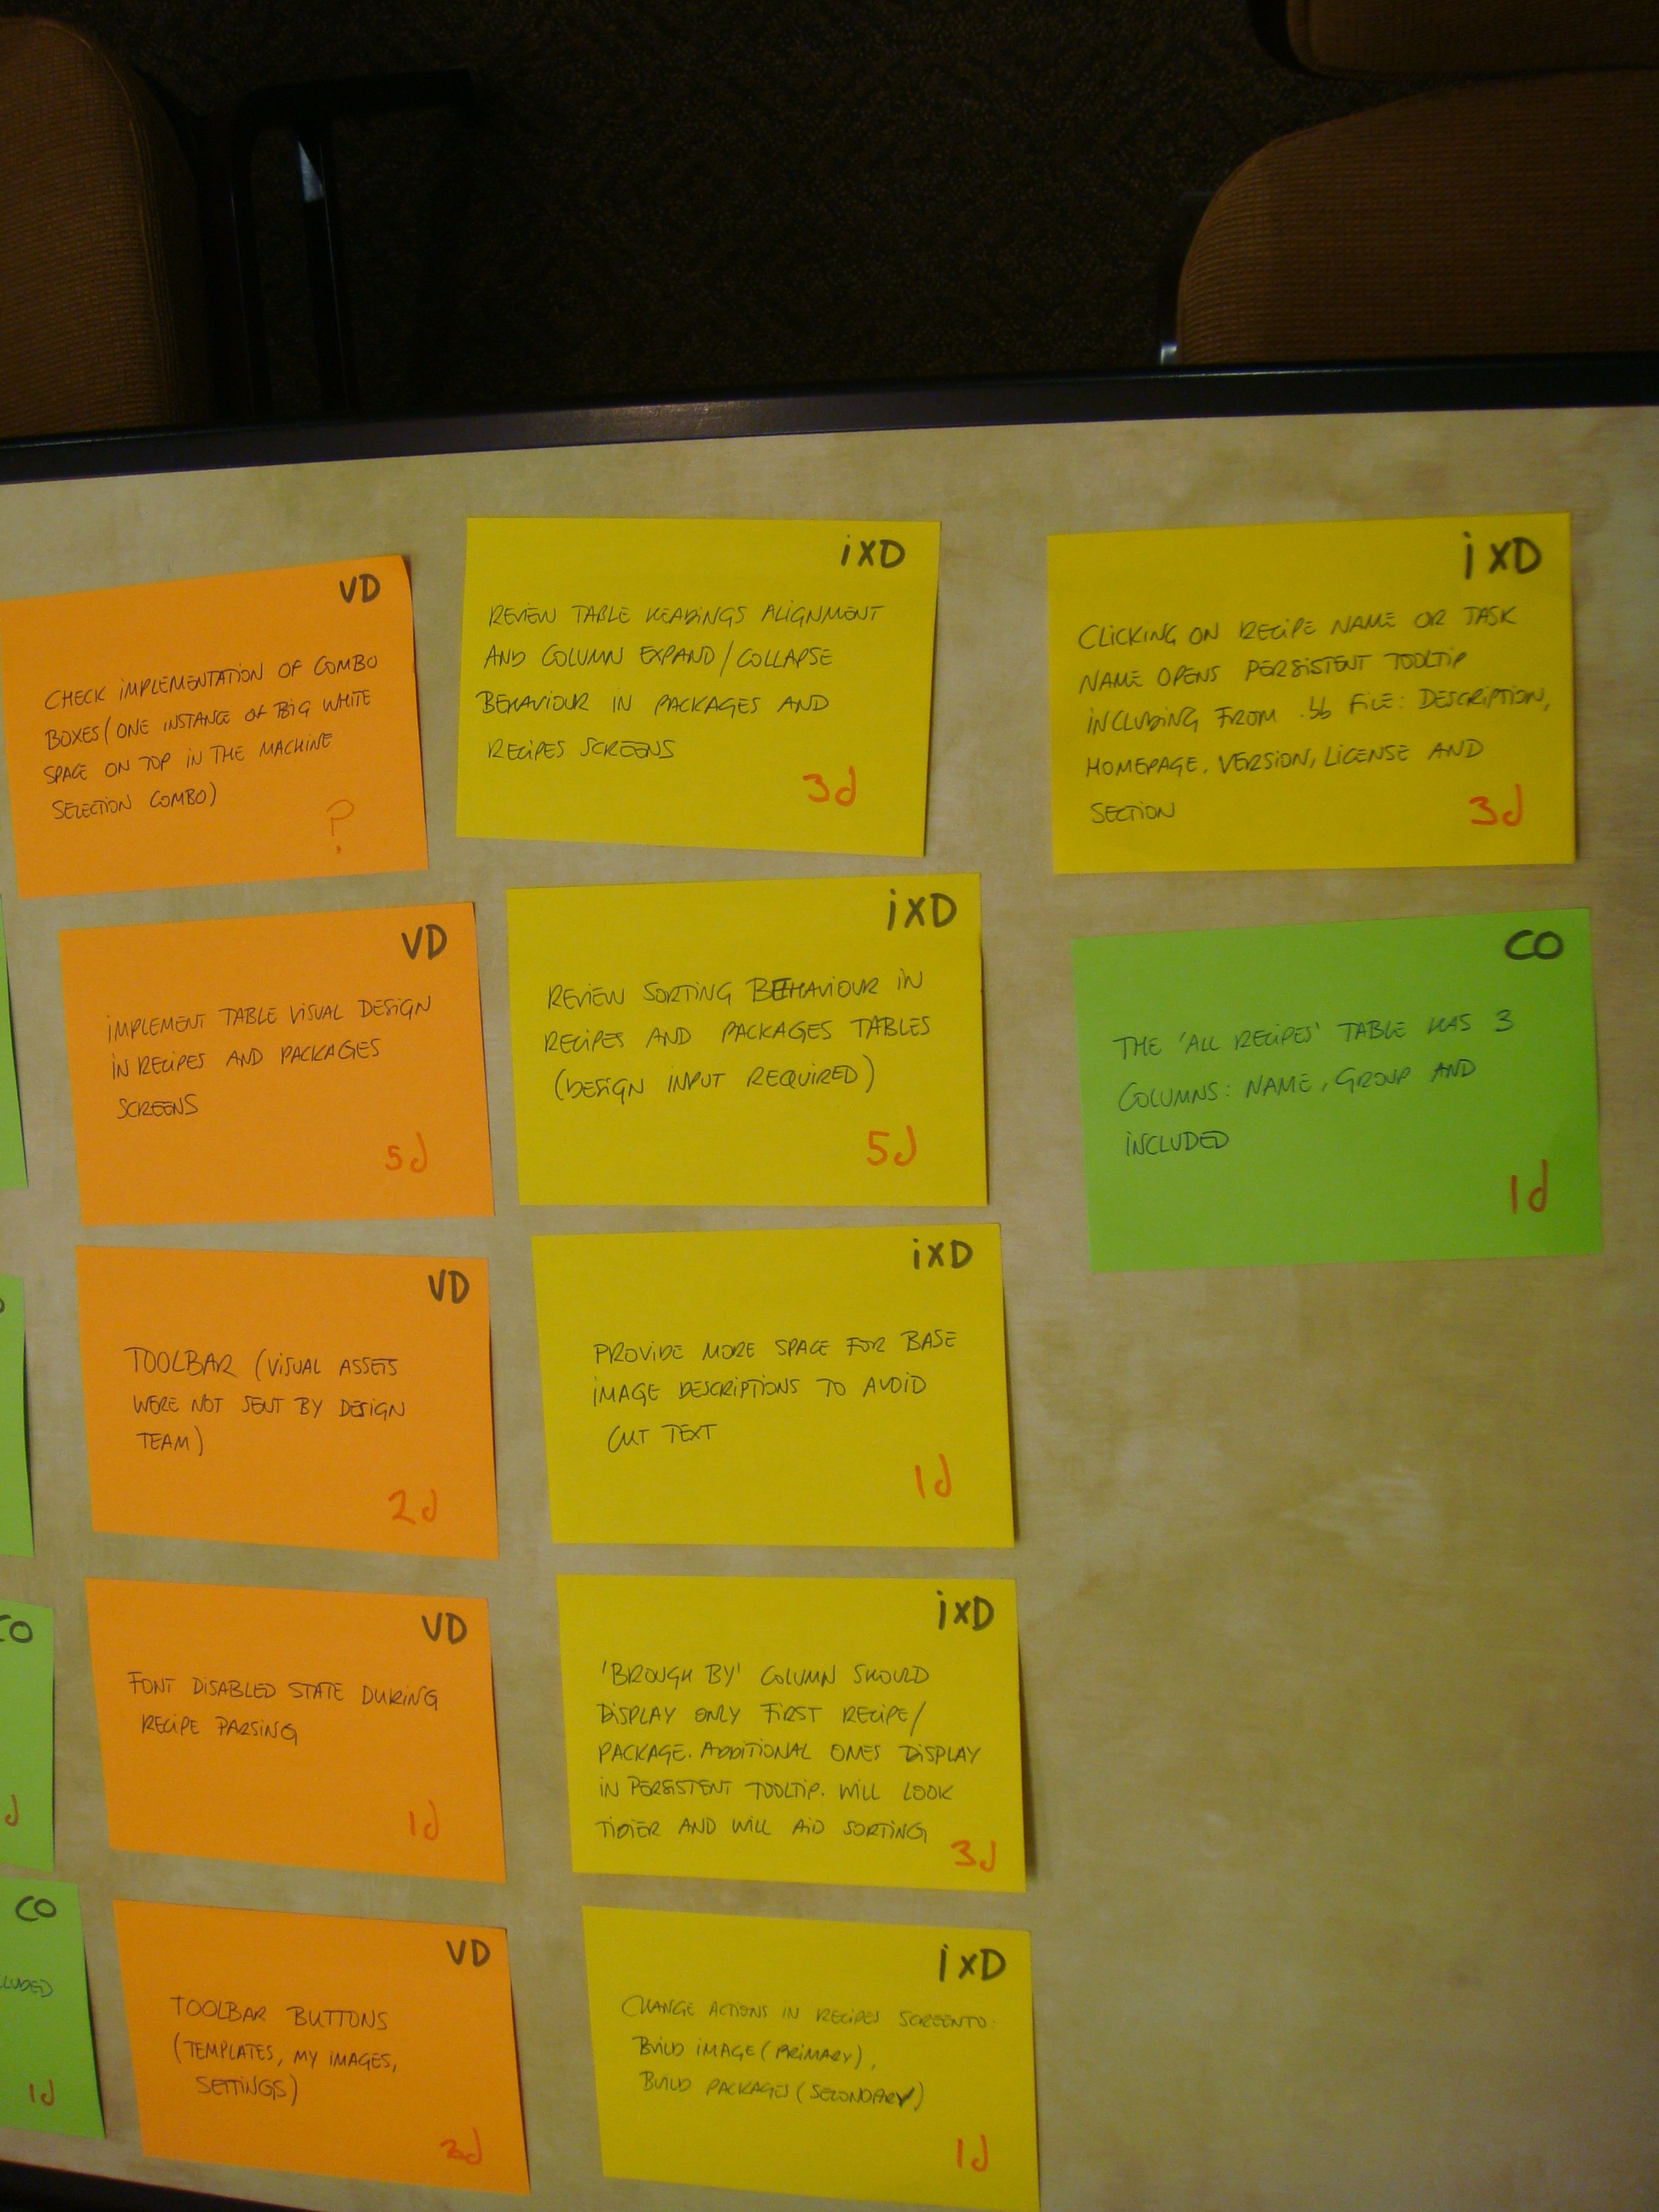
Review results of London design team
Hob work during the 1.4 release
This document talks about the improvements we made to Hob during the 1.3 release, and what we need to work on during 1.4 from a user interface design point of view.
It is a good place to start if you will be designing or developing for Hob during the 1.4 release.
File:GTK Hob moving to 1.4.pdf
Try and play with Web Hob demo
This code (http://git.yoctoproject.org/cgit/cgit.cgi/poky-contrib/log/?h=xtlv/webhob-v0.1) is based on old version bitbake, so the workflow is different from the newest bitbake and hob.
It makes up of 2 parts. The 2 parts need to be run separately: one is bitbake; the other is the code based on django framework. So far all of them are only a simple demo and the code is messy.
1. steps to set up the demo
1.1. required software
mysql (version >=5.0)
system browser (supporting HTML5, Firefox or Chrome)
django python library (1.3.1 version, download link, http://www.djangoproject.com/download/1.3.1/tarball/)
1.2. mysql database configuraton
Edit the file my.cnf, fedora system in /etc/my.cnf, add this statement max_allowed_packet=50M.
[xiaotong@lxt django_webhob]$ vim /etc/my.cnf
       [mysqld]
        datadir=/var/lib/mysql
        socket=/var/lib/mysql/mysql.sock
        user=mysql
        max_allowed_packet=50M
        .............
Start mysql and create a database named bitbake.
Import database file in directory /poky-contrib/bitbake/lib/bb/ui/django_webhob/bitbake.sql
[xiaotong@lxt ~]mysql -uroot bitbake < ~/workspace/python/poky-contrib/bitbake/lib/bb/ui/django_webhob/bitbake.sql
2. steps to run this demo.
Start bitbake with webhob helper, the command is:
bitbake 127.0.0.1:8080 -u webhob
Run django web server and switch the directory to 'cd bitbake/lib/bb/ui/django_webhob/', then using the command:
[xiaotong@lxt django_webhob] python manage.py runserver 127.0.0.1:8000
If everything is OK. to visit http://127.0.0.1:8000, you will see the demo.
Any problems please contact xiaotongx.lv@intel.com.
