Web Application for Interactive Kiosk Devices: Difference between revisions
Emma.ciobanu (talk | contribs) No edit summary |
Emma.ciobanu (talk | contribs) No edit summary |
||
| (9 intermediate revisions by the same user not shown) | |||
| Line 1: | Line 1: | ||
__FORCETOC__ | __FORCETOC__ | ||
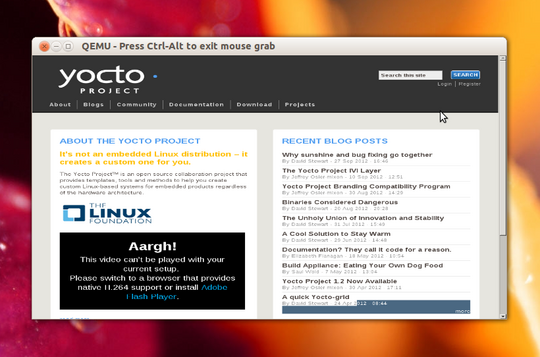
[[File:Screenshot from 2012-10-05 15 28 34.png|thumb|upright=1. | [[File:Screenshot from 2012-10-05 15 28 34.png|thumb|upright=1.8|Kiosk device that runs Midori browser]] | ||
An [http://http://en.wikipedia.org/wiki/Interactive_kiosk Interactive Kiosk Device] is a computer terminal with proper hardware and software support that provides public access to different kinds of information. They're used in a large variety of domains including commerce, education, entertaining, tourist information and many others. | An [http://http://en.wikipedia.org/wiki/Interactive_kiosk Interactive Kiosk Device] is a computer terminal with proper hardware and software support that provides public access to different kinds of information. They're used in a large variety of domains including commerce, education, entertaining, tourist information and many others. | ||
| Line 10: | Line 10: | ||
The application integrates Midori as the main web browser. The browser was used as a fast and lightweight solution that meets up all the expectations of the project. More information on this topic can be found at http://en.wikipedia.org/wiki/Midori_(web_browser). | The application integrates Midori as the main web browser. The browser was used as a fast and lightweight solution that meets up all the expectations of the project. More information on this topic can be found at http://en.wikipedia.org/wiki/Midori_(web_browser). | ||
== Integration Of meta-web-kiosk | == Integration Of meta-web-kiosk Into Poky == | ||
This tutorial assumes that you already have a poky distribution on the local machine. If this is not the case follow the steps described in the [http://www.yoctoproject.org/docs/current/dev-manual/dev-manual.html poky manual] to download and configure poky. | This tutorial assumes that you already have a poky distribution on the local machine. If this is not the case follow the steps described in the [http://www.yoctoproject.org/docs/current/dev-manual/dev-manual.html poky manual] to download and configure poky. | ||
Here are the steps to follow in order to get the new image to work: | Here are the steps to follow in order to get the new image to work: | ||
* Download the repository from [ | * Download the repository from [http://git.yoctoproject.org/cgit/cgit.cgi/meta-web-kiosk/ yoctoproject.org] by tracking the emac/meta-web-kiosk branch. This step will generate a new folder called meta-web-kiosk. | ||
* Copy the newly cloned folder in the root of poky. | * Copy the newly cloned folder in the root of poky. | ||
* Open meta/classes/core-image.classes and add the following line | * Open <tt>meta/classes/core-image.classes</tt> and add the following line | ||
PACKAGE_GROUP_x11-browser=”packagegroup-core-x11-browser” | PACKAGE_GROUP_x11-browser=”packagegroup-core-x11-browser” | ||
* If you are using proxies in your network settings | * If you are using proxies in your network settings uncomment the following lines from <tt>meta-web-kiosk/recipes-browser/midori-session/midori-session_0.1.bb</tt> | ||
install –d ${D}/home/${USER}/.config/${BROWSER}/ | install –d ${D}/home/${USER}/.config/${BROWSER}/ | ||
install ${S}/config/ ${D}/home/${USER}/.config/${BROWSER} | install ${S}/config/ ${D}/home/${USER}/.config/${BROWSER} | ||
* | ** open <tt>meta-web-kiosk/recipes-browser/midori-session/midori-session/config</tt> and add you proxy settings. | ||
* Source the oe-init-build-env script | * Source the oe-init-build-env script | ||
. oe-init-build-env | . oe-init-build-env | ||
* Open conf/bblayers.conf to add the newly configured layer | * Open <tt>conf/bblayers.conf</tt> to add the newly configured layer | ||
[...] | |||
${path_to_poky}/meta \ | ${path_to_poky}/meta \ | ||
[...] | |||
${path_to_poky}/meta-web-kiosk \ | ${path_to_poky}/meta-web-kiosk \ | ||
[...] | |||
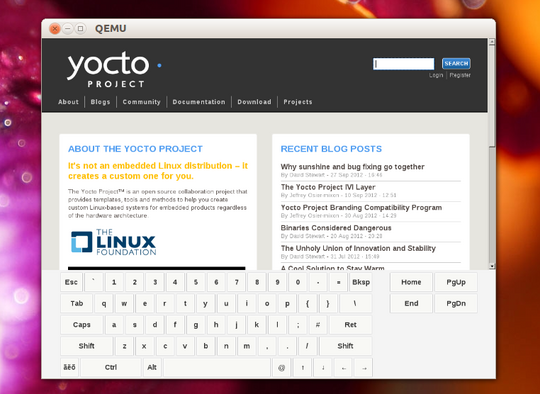
[[File:Screenshot from 2012-10-05 15 35 12.png|thumb|right|upright=1.8| Web Kiosk Application with touchscreen Support]] | |||
* Now that everything is set you can build the new image with bitbake | * Now that everything is set you can build the new image with bitbake | ||
bitbake core-image-web-kiosk | bitbake core-image-web-kiosk | ||
* and run it in qemu or install it on a device with touchscreen support. | * and run it in qemu or install it on a device with touchscreen support. | ||
== Enable touchscreen support == | |||
If you need touchscreen support you should first of all make sure it is enabled in the bsp recipes. For this edit | |||
* edit <tt>/meta/recipes-bsp/formfactor/${arch}</tt> to make sure you have the HAVEKEYBOARD variable disabled | |||
[...] | |||
HAVEKEYBOARD=0 | |||
[...] | |||
Replace <tt>${path_to_poky}</tt> with the actual path to poky root and <tt>${arch}</tt> with the machine you are building the image for. This is specified either by editing <tt>${path_to_build_folder}/conf/local.conf</tt> in the MACHINE variable, or, directly, when building the new image by adding MACHINE=${arch} before the image name. The command should look something like this: | |||
MACHINE=${arch} bitbake core-image-web-kiosk | |||
If you have a particular arch, then you should add it into the new layer. For this | |||
* edit <tt>meta-web-kiosk/recipes-bsp/formfactor/formfactor</tt> | |||
* create a new folder with the architecture name | |||
* create a new file inside the arch folder and name it machconfig | |||
* edit the <tt>machconfig file</tt> to make sure you disable the keyboard | |||
[...] | |||
HAVEKEYBOARD=0 | |||
[...] | |||
* add the rest of arch-dependent configuration and save the file. | |||
* build the image by either specifying the arch in <tt>${path_to_build_folder}/conf/local.conf</tt> or by adding the MACHINE variable in front of bitbake when building, as shown before. | |||
Latest revision as of 14:19, 31 January 2013
An Interactive Kiosk Device is a computer terminal with proper hardware and software support that provides public access to different kinds of information. They're used in a large variety of domains including commerce, education, entertaining, tourist information and many others.
Goal Of The Project
The project focuses on developing a minimal image with an integrated browser aimed to be used in touchscreen kiosk applications/operating systems. It consists of creating a yocto based application that will automatically start a Midori browser immediately after boot. The login is made automatically after boot and before the browser starts.
The image is developed as a new layer that is added to poky, a platform-independent, cross-compiling layer that provides useful features and functionalities for embedded solutions. For further information about the Yocto, please visit the project’s wiki page or the official website.
The application integrates Midori as the main web browser. The browser was used as a fast and lightweight solution that meets up all the expectations of the project. More information on this topic can be found at http://en.wikipedia.org/wiki/Midori_(web_browser).
Integration Of meta-web-kiosk Into Poky
This tutorial assumes that you already have a poky distribution on the local machine. If this is not the case follow the steps described in the poky manual to download and configure poky. Here are the steps to follow in order to get the new image to work:
- Download the repository from yoctoproject.org by tracking the emac/meta-web-kiosk branch. This step will generate a new folder called meta-web-kiosk.
- Copy the newly cloned folder in the root of poky.
- Open meta/classes/core-image.classes and add the following line
PACKAGE_GROUP_x11-browser=”packagegroup-core-x11-browser”
- If you are using proxies in your network settings uncomment the following lines from meta-web-kiosk/recipes-browser/midori-session/midori-session_0.1.bb
install –d ${D}/home/${USER}/.config/${BROWSER}/
install ${S}/config/ ${D}/home/${USER}/.config/${BROWSER}
- open meta-web-kiosk/recipes-browser/midori-session/midori-session/config and add you proxy settings.
- Source the oe-init-build-env script
. oe-init-build-env
- Open conf/bblayers.conf to add the newly configured layer
[...]
${path_to_poky}/meta	\
[...]
${path_to_poky}/meta-web-kiosk	\
[...]
- Now that everything is set you can build the new image with bitbake
bitbake core-image-web-kiosk
- and run it in qemu or install it on a device with touchscreen support.
Enable touchscreen support
If you need touchscreen support you should first of all make sure it is enabled in the bsp recipes. For this edit
- edit /meta/recipes-bsp/formfactor/${arch} to make sure you have the HAVEKEYBOARD variable disabled
[...]
HAVEKEYBOARD=0
[...]
Replace ${path_to_poky} with the actual path to poky root and ${arch} with the machine you are building the image for. This is specified either by editing ${path_to_build_folder}/conf/local.conf in the MACHINE variable, or, directly, when building the new image by adding MACHINE=${arch} before the image name. The command should look something like this:
MACHINE=${arch} bitbake core-image-web-kiosk
If you have a particular arch, then you should add it into the new layer. For this
- edit meta-web-kiosk/recipes-bsp/formfactor/formfactor
- create a new folder with the architecture name
- create a new file inside the arch folder and name it machconfig
- edit the machconfig file to make sure you disable the keyboard
[...]
HAVEKEYBOARD=0
[...]
- add the rest of arch-dependent configuration and save the file.
- build the image by either specifying the arch in ${path_to_build_folder}/conf/local.conf or by adding the MACHINE variable in front of bitbake when building, as shown before.

