ToasterTable: Difference between revisions
Elliot Smith (talk | contribs) No edit summary |
Michael Wood (talk | contribs) No edit summary |
||
| (2 intermediate revisions by 2 users not shown) | |||
| Line 1: | Line 1: | ||
[[Category:Toaster]] | |||
== Introduction to ToasterTable == | == Introduction to ToasterTable == | ||
| Line 74: | Line 75: | ||
The self.default_orderby member set in __init__() specifies the default column to use for ordering the table. In this case, the completed_on field is used to sort the builds in the table; the "-" specifies reverse order, so the newest build appears at the top of the table. Note that the value for self.default_orderby should match the name of a field in the model, and the name of a column added to the table. | The self.default_orderby member set in __init__() specifies the default column to use for ordering the table. In this case, the completed_on field is used to sort the builds in the table; the "-" specifies reverse order, so the newest build appears at the top of the table. Note that the value for self.default_orderby should match the name of a field in the model, and the name of a column added to the table. | ||
See the [[#Column options]] section for full details of the column options available. | See the [[#Column options|Column options]] section for full details of the column options available. | ||
=== Add the template === | === Add the template === | ||
| Line 162: | Line 163: | ||
* '''static_data_template''' (string; optional): The template to render for each row; the data for the row is interpolated into the template. This is more flexible than field_name, as you can add links, conditional statements and additional formatting each time the cell for this column is rendered for a record. | * '''static_data_template''' (string; optional): The template to render for each row; the data for the row is interpolated into the template. This is more flexible than field_name, as you can add links, conditional statements and additional formatting each time the cell for this column is rendered for a record. | ||
* '''orderable''' (boolean; default=False): True if the table can be ordered by this column. Note that if this is True, either field_name or static_data_name should match a name of one of the fields in the queryset for the ToasterTable. If not, Toaster will not be able to sort the table by that column. | * '''orderable''' (boolean; default=False): True if the table can be ordered by this column. Note that if this is True, either field_name or static_data_name should match a name of one of the fields in the queryset for the ToasterTable. If not, Toaster will not be able to sort the table by that column. | ||
* '''filter_name''' (string; optional): Name of the TableFilter associated with this column, which adds filtering behaviour for this column; see the [[#Filter API]] section for full details. | * '''filter_name''' (string; optional): Name of the TableFilter associated with this column, which adds filtering behaviour for this column; see the [[#Filter API|Filter API]] section for full details. | ||
As an example, I'll add two columns to the Mini Builds table. | As an example, I'll add two columns to the Mini Builds table. | ||
| Line 458: | Line 459: | ||
[[File:MiniBuildsTable-outcomefilter.png|750px|Adding an outcome filter to the MiniBuildsTable]] | [[File:MiniBuildsTable-outcomefilter.png|750px|Adding an outcome filter to the MiniBuildsTable]] | ||
outcome_filter is the string used to refer to the filter in the querystring; see the section [[#How filters are applied]] for more details about how filters are applied. | outcome_filter is the string used to refer to the filter in the querystring; see the section [[#How filters are applied|How filters are applied]] for more details about how filters are applied. | ||
=== Add table filter actions === | === Add table filter actions === | ||
| Line 548: | Line 549: | ||
* The table data is fetched via Ajax, using the filter and filter_value parameters as part of the URL. These set the filter name, action and value to use for filtering. | * The table data is fetched via Ajax, using the filter and filter_value parameters as part of the URL. These set the filter name, action and value to use for filtering. | ||
* The back-end applies the requested filter action to the queryset (as well as any existing search string). Each filter action has a set of criteria which it applies to the queryset, as follows: | * The back-end applies the requested filter action to the queryset (as well as any existing search string). Each filter action has a set of criteria which it applies to the queryset, as follows: | ||
** TableFilterActionToggle: The recordset is filtered by the criteria specified when the action is created (see [[#Add table filter actions]] for an example). | ** TableFilterActionToggle: The recordset is filtered by the criteria specified when the action is created (see [[#Add table filter actions|Add table filter actions]] for an example). | ||
** TableFilterActionDay: A date range clause is constructed at the time the filter action is applied. For example, if the field the filter action applies to is "completed_on", the day set for the TableFilterActionDay is "today", and today is 2016-03-05, the query clause (in pseudo-SQL) is "completed_on >= '2016-03-04 00:00:00' AND completed_on <= '2016-03-04 23:59:59'". | ** TableFilterActionDay: A date range clause is constructed at the time the filter action is applied. For example, if the field the filter action applies to is "completed_on", the day set for the TableFilterActionDay is "today", and today is 2016-03-05, the query clause (in pseudo-SQL) is "completed_on >= '2016-03-04 00:00:00' AND completed_on <= '2016-03-04 23:59:59'". | ||
** TableFilterActionDateRange: This is similar to TableFilterActionDay, but the user specifies the start and end dates; these are in the filter_value variable in the querystring. For example, if the field the filter action applies to is "completed_on" and the date range is "2016-03-01,2016-03-04", the query clause (in pseudo-SQL) is "completed_on >= '2016-03-01 00:00:00' AND completed_on <= '2016-03-04 23:59:59'". | ** TableFilterActionDateRange: This is similar to TableFilterActionDay, but the user specifies the start and end dates; these are in the filter_value variable in the querystring. For example, if the field the filter action applies to is "completed_on" and the date range is "2016-03-01,2016-03-04", the query clause (in pseudo-SQL) is "completed_on >= '2016-03-01 00:00:00' AND completed_on <= '2016-03-04 23:59:59'". | ||
* The filtered queryset is returned as JSON. | * The filtered queryset is returned as JSON. | ||
* The Toaster UI code redraws the table with the filtered queryset. | * The Toaster UI code redraws the table with the filtered queryset. | ||
Latest revision as of 17:15, 17 May 2016
Introduction to ToasterTable
ToasterTable is a set of classes in the toastergui module of the Toaster Django application. It is used to present a set of database records in a style and with functionality consistent with the rest of Toaster.
The functionality provided by ToasterTable includes:
- Sorting
- Column hiding/showing
- Filtering
- Paging
- Search
When a ToasterTable is updated, a new set of records matching the filter criteria, search string, sort order and page number is fetched from the back-end using Ajax requests. The ToasterTable is then updated in place from the JSON in the response, using JavaScript to redraw the table rows.
As a developer, you don't need to worry (necessarily) about how this works: you just implement a subclass of ToasterTable, specify a template for rendering it, and supply a URL mapping.
The following sections explain how to use ToasterTable. The filenames in these sections refer to files in the toastergui/ directory.
Note that to be able to follow the example, you will need to set up Toaster for development work. This is described in the Toaster manual.
How to create a ToasterTable
Most of the tables needed for Toaster are already implemented. Many of the key tables in Toaster already use ToasterTable, but some don't. A full list of unconverted tables is in https://bugzilla.yoctoproject.org/show_bug.cgi?id=8363.
This means that you will typically be porting an existing table to ToasterTable, rather than adding a new table from scratch. However, to keep things simple, this section explains how to create a ToasterTable from scratch. Knowing how to do this should make it easier to port an existing table to ToasterTable in future.
To provide a worked example, I'll create a new table which is a variant of the existing "all builds" table, using a reduced number of columns and filters.
Create the table class
A quick overview of where things are and where they go when creating a table:
- widgets.py contains the ToasterTable class. This is the base class for all ToasterTables.
- New tables are added to tables.py.
- A table in tables.py maps to a URL within the Toaster application; the mapping is defined in urls.py.
- Templates for the table are added to templates/.
- If you need custom template tags, these go in templatetags/.
To create a new table, first add the class definition to tables.py:
# import any models you need for the table
from orm.models import Build

class MiniBuildsTable(ToasterTable):
    def __init__(self, *args, **kwargs):
        super(MiniBuildsTable, self).__init__(*args, **kwargs)
        self.default_orderby = '-completed_on'
        self.title = 'Mini Builds Table'

    def setup_queryset(self, *args, **kwargs):
        self.queryset = Build.objects.all()

    def setup_columns(self, *args, **kwargs):
        self.add_column(title='Completed on',
                        help_text='The date and time when the build finished',
                        hideable=False,
                        orderable=True,
                        static_data_name='completed_on',
                        static_data_template='{{data.completed_on | date:"d/m/y H:i"}}')
The key to creating a ToasterTable is to decide which data is going to be shown in the table and define this in the setup_queryset() method. This will typically be a queryset derived from one model in the Toaster application. To see the available models, check the orm/models.py file.
Each row in the table corresponds to a record in the queryset. The setup_queryset() method specifies how to get this queryset for the table: it must set the self.queryset property to the Django queryset containing the data. In the MiniBuildsTable, we show all of the builds by default (using the standard Django model API).
Each column in the ToasterTable corresponds to a field in the queryset. Inside a table row, a cell corresponds to one or more fields from each record in the queryset. A cell can show various aspects of a record: a formatted version of a field's value, an amalgam of multiple fields, a computation based on a group of related records etc. For example, in a row of the MiniBuildsTable, a cell might contain the outcome of the build, the number of tasks which failed during the build, or the time since the build completed.
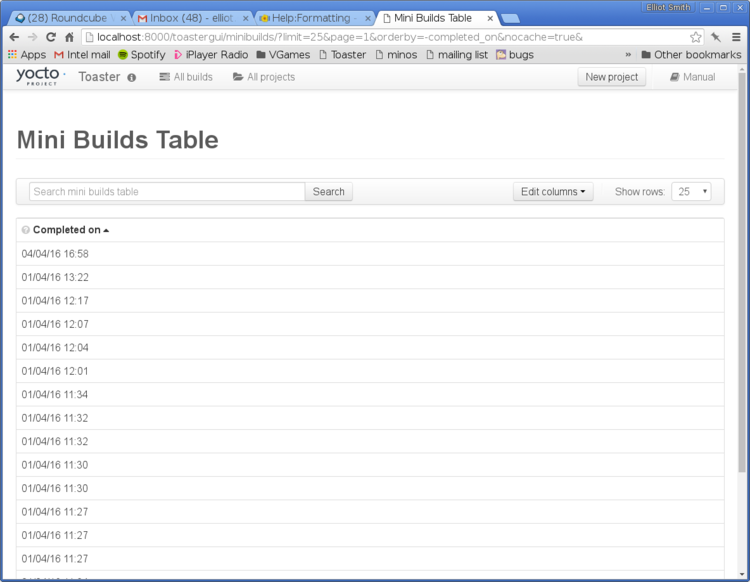
The setup_columns() method defines which columns should be shown in the table. In this initial version of MiniBuildsTable, only the "completed_on" column is shown. This column has the following properties:
- It cannot be hidden (hideable=False).
- It can be used to order the table (orderable=True).
- static_data_name sets the name of the column so that it can be married up with the sort order specified in the querystring, and with the default_orderby for the ToasterTable (see below).
- static_data_template specifies how to render a value from a row into the HTML for the page. The data.completed_on reference in the template demonstrates how to access field values from the record for the row: the object representing the current row can be reference via the 'data' object in the static_data_template string. The whole of Django's template machinery is available when specifying how to render properties of the record for a row: you can include other templates and use filters and template tags (your own or Django's). In this case, the date filter is used to format the date into a human-readable form.
The self.default_orderby member set in __init__() specifies the default column to use for ordering the table. In this case, the completed_on field is used to sort the builds in the table; the "-" specifies reverse order, so the newest build appears at the top of the table. Note that the value for self.default_orderby should match the name of a field in the model, and the name of a column added to the table.
See the Column options section for full details of the column options available.
Add the template
This should go into templates/, as this is where Django looks for view templates.
In all cases, you will need to include the toastertable.html template from your template. You will also need to add links for the jQuery UI CSS and JS files. (In an ideal world, this would be in toastertable.html, but for historical reasons, it isn't yet.)
Finally, you should define an xhr_table_url variable in your template. This is used to request new data for the table when filters or search terms are applied, or if a new page is requested. ToasterTable will send a request for the table JSON to this URL, then automatically refresh the table display with the new data when it's received.
As an example, here's a minimal template for the Mini Builds page, which would go in templates/minibuilds.html:
{% extends 'base.html' %}
{% load static %}

{% block extraheadcontent %}
  <link rel="stylesheet" href="{% static 'css/jquery-ui.min.css' %}" type='text/css'>
  <link rel="stylesheet" href="{% static 'css/jquery-ui.structure.min.css' %}" type='text/css'>
  <link rel="stylesheet" href="{% static 'css/jquery-ui.theme.min.css' %}" type='text/css'>
  <script src="{% static 'js/jquery-ui.min.js' %}"></script>
{% endblock %}

{% block title %}{{title}}{% endblock %}

{% block pagecontent %}
  <h1 class="page-header top-air">{{title}}</h1>
  {% url 'minibuilds' as xhr_table_url %}
  {% include 'toastertable.html' %}
{% endblock %}
Depending on which side menus or other wrapping you need around your table, you may need to create a template by adapting an existing one (particularly if you are porting a table to ToasterTable).
Note that the template above extends base.html, which provides the header/footer for Toaster itself but doesn't have a side menu. For an example of a more complex page which does have a side menu, see generic-toastertable-page.html and its parent template, baseprojectpage.html.
The important points to remember, though, are shown in the example template above; in particular, the need to import the jQuery UI assets, set xhr_table_url, and include the toastertable.html template.
Add a URL mapping for the table
To be able to view the Mini Builds page, it needs a mapping in the urls.py file:
urlpatterns = patterns('toastergui.views',
    // ... other mappings ...

    url(r'^minibuilds/$',
        tables.MiniBuildsTable.as_view(template_name='minibuilds.html'),
        name='minibuilds')
)
This is standard Django template mapping code. The only wrinkle is that because a ToasterTable is a Django TemplateView subclass, we call Django's as_view() method on our table class to render it, passing the name of the template file. (Usually, a view mapping would specify a function in the views.py file.)
Now, with Toaster running locally, you should be able to visit
http://localhost:8000/toastergui/minibuilds/
in a browser and see your Mini Builds table (note that it will be empty unless you've run some builds).
Aside: turning off ToasterTable caching
By default, ToasterTable caches data to prevent the same data being fetched multiple times. However, during development, this may mean that you see stale data in the table (for example, I changed the setup_columns() method in MiniBuildsTable to remove a column, but when I refreshed the page, the column was still present).
To get around this, pass the nocache option in the querystring in your browser, e.g.
http://localhost:8000/toastergui/minibuilds?nocache=true
This ensures that ToasterTable doesn't cache data between page refreshes.
Further ToasterTable configuration
The following sections flesh out the options for adding columns to a ToasterTable, adding more non-table data to the page, and using the table filter APIs.
Column options
As stated previously, columns are added to the table inside the setup_columns() method of your ToasterTable subclass. The following options can be set when adding a column to a table:
- title (string): The heading for the column.
- help_text (string; optional): Text which describes the column content of the column; this is shown in a popover when the question mark next to the column heading is hovered over. If not set, the column doesn't have a help icon.
- hideable (boolean; default=True): True if the user can hide the column (using the "Edit columns" drop-down).
- hidden (boolean; default=False): True if the column is hidden by default; the user can show the column using the "Edit columns" drop-down.
- field_name (string; optional): Name of the property to render into the field. Note that this can be a property or method on the model being rendered (e.g. for a Build object, completed_on) ; it could also be a property of a related object (e.g. for a Build, project__name).
- static_data_name (string; optional): This should not be set if field_name is set, but must be set if static_data_template is set.
- static_data_template (string; optional): The template to render for each row; the data for the row is interpolated into the template. This is more flexible than field_name, as you can add links, conditional statements and additional formatting each time the cell for this column is rendered for a record.
- orderable (boolean; default=False): True if the table can be ordered by this column. Note that if this is True, either field_name or static_data_name should match a name of one of the fields in the queryset for the ToasterTable. If not, Toaster will not be able to sort the table by that column.
- filter_name (string; optional): Name of the TableFilter associated with this column, which adds filtering behaviour for this column; see the Filter API section for full details.
As an example, I'll add two columns to the Mini Builds table.
First, a column to show the project name for the build:
class MiniBuildsTable(ToasterTable):
    # ... other code ...

    def setup_columns(self, *args, **kwargs):
        self.add_column(title='Completed on',
                        help_text='The date and time when the build finished',
                        hideable=False,
                        orderable=True,
                        static_data_name='completed_on',
                        static_data_template='{{data.completed_on | date:"d/m/y H:i"}}')

        self.add_column(title='Project',
                        help_text='The project associated with this build',
                        hideable=True,
                        orderable=True,
                        field_name='project__name')
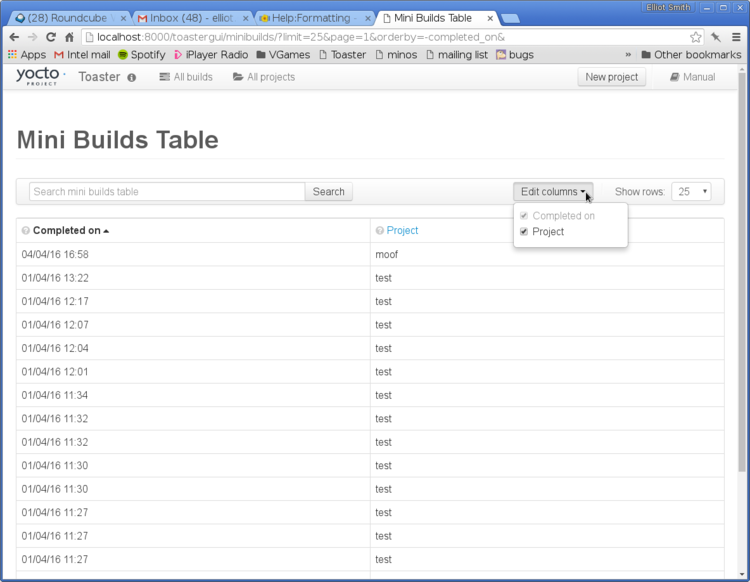
The rest of the MiniBuildsTable remains the same: only setup_columns() changes. In this case, I'm showing the project name for the build using the field_name property for the column. This is simple, but doesn't allow me to modify how the value is formatted or add any HTML elements around it.
Try http://localhost:8000/toastergui/minibuilds/ again and you should see the new column. Note that this column can be hidden in the "Edit columns" drop-down, and can also be used to order the table.
Next, a column to show the outcome for the build, with a link to that build's dashboard:
class MiniBuildsTable(ToasterTable):
    # ... other code ...

    def setup_columns(self, *args, **kwargs):
        outcome_template = '''
        <a href="{% url 'builddashboard' data.id %}">
            {% if data.outcome == 0 %}
                succeeded
            {% elif data.outcome == 1 %}
                failed
            {% endif %}
        </a>
        '''

        self.add_column(title='Completed on',
                        help_text='The date and time when the build finished',
                        hideable=False,
                        orderable=True,
                        static_data_name='completed_on',
                        static_data_template='{{data.completed_on | date:"d/m/y H:i"}}')

        self.add_column(title='Project',
                        help_text='The project associated with this build',
                        hideable=True,
                        orderable=True,
                        field_name='project__name')

        self.add_column(title='Outcome',
                        help_text='The outcome of the build',
                        hideable=True,
                        orderable=True,
                        static_data_name='outcome',
                        static_data_template=outcome_template)
In this case, static_data_template is used as we don't just want the value of the outcome field for the row: we also want to create a link. The template is slightly more complex than previous ones, so it's in a variable to make the code cleaner. Note the use of the built-in Django url template tag to get the URL for the build dashboard.
There is one issue with outcome_template: it compares the outcome field's value with integer values (0 for succeeded, 1 for failed) to determine what to show in the cell. This is a bit opaque for any developer coming to the project later, and also fragile if the integer values representing build outcomes change at a later date. It would be better to use the constants for Build outcomes (Build.SUCCEEDED, Build.FAILED) instead. However, the Build object is not accessible to the template, as it isn't passed in with the template context. The next section explains how to deal with this and similar missing context.
Additional context data
Sometimes a page will require data which is not in the queryset. This data may be shown on the page, or may influence how other data is rendered. For example, in the previous section, the outcome was displayed according to whether the build was a success or had some other outcome; but, rather than using hard-coded integer values, it would be better to use the Build.SUCCEEDED and Build.FAILED constants for this.
As another example, the Mini Builds page could show the time of the most recent build. While this could be done with some work in the template, it would be much cleaner to add a variable for "most_recent_build" to the template context instead.
In both cases, the required data must be added to the extra context data for the page. This can be done in one of two ways, depending on how you want to use it:
- If the data needs to be available to column templates, it should be added to the static_context_extra dictionary for the ToasterTable. For example, because we need to access constants on the Build class in the column templates, we should add Build to static_context_extra.
- If the data needs to be available to other templates (e.g. minibuilds.html in the case of Mini Builds), it should be set in the get_context_data() method.
Data for column templates
Data can be made available to column templates for a ToasterTable by adding it to the static_context_extra dictionary inside the __init__() method. This makes the data available for use in column templates (set using static_data_template). However, this data is only accessible from column templates, and is not available to the other templates used to render the page.
For example, to add the Build class to static_context_extra so that it can be used in a column template:
class MiniBuildsTable(ToasterTable):
    def __init__(self, *args, **kwargs):
        super(MiniBuildsTable, self).__init__(*args, **kwargs)
        self.default_orderby = '-completed_on'
        self.title = 'Mini Builds Table'

        # add the Build class to the static context
        self.static_context_extra['Build'] = Build

    def setup_queryset(self, *args, **kwargs):
        self.queryset = Build.objects.all()

    def setup_columns(self, *args, **kwargs):
        # reference constants on Build from a column template
        outcome_template = '''
        <a href="{% url 'builddashboard' data.id %}">
            {% if data.outcome == extra.Build.SUCCEEDED %}
                succeeded
            {% elif data.outcome == extra.Build.FAILED %}
                failed
            {% endif %}
        </a>
        '''

        # ... the rest of setup_columns is the same ...
To refer to data from static_context_extra in a column template, use the extra keyword (similar to how the data keyword works). In this case, I referenced the constants on the Build class with extra.Build.SUCCEEDED and extra.Build.FAILED.
The page renders the same as before, but we no longer have hard-coded integer values in the column templates.
Data for other templates
Adding other data to the context for use in the page template is the same as for other Django TemplateView objects. See the Django documentation for full details.
As a simple worked example, here's how we could show the most recent Toaster build in the Mini Builds page. First, we need to implement get_context_data() and add our own data to it; in this case, a "most_recent_build" property containing a Build object:
class MiniBuildsTable(ToasterTable):
    # ... other methods remain as they were ...

    def get_context_data(self, **kwargs):
        # invoke the super class' method, to include data like the page
        # title in the context
        context = super(MiniBuildsTable, self).get_context_data(**kwargs)

        # add the most recent build to the context
        all_builds = Build.objects.all().order_by('-completed_on')
        context['most_recent_build'] = all_builds.first()

        return context
All of the properties on the context object returned by get_context_data() are available in the page template, as per the context for a standard Django template. To show the most recent build in the minibuilds.html template, we now use the most_recent_build property we added in get_context_data(), we modify the pagecontent block:
{% block pagecontent %}
  <h1 class="page-header top-air">{{title}}</h1>

  <!-- SHOW MOST RECENT BUILD -->
  {% if most_recent_build %}
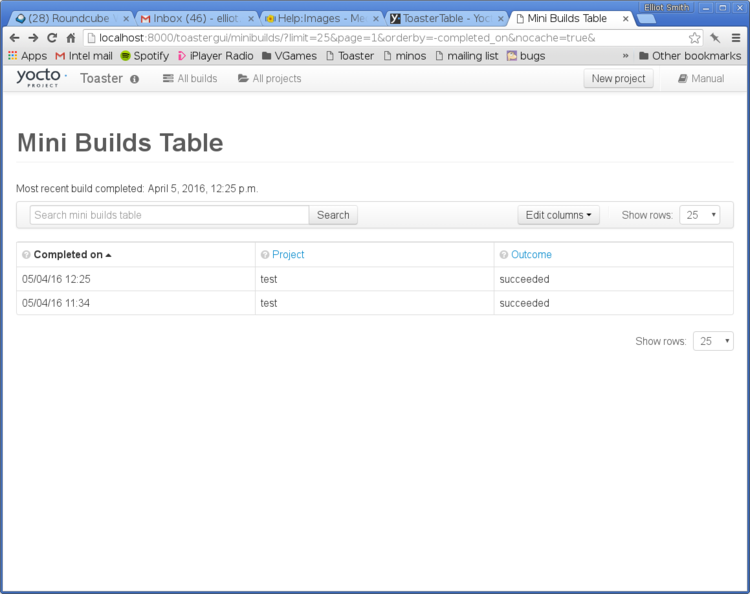
    <p>Most recent build completed: {{most_recent_build.completed_on}}</p>
  {% endif %}

  {% url 'minibuilds' as xhr_table_url %}
  {% include 'toastertable.html' %}
{% endblock %}
The result looks like this:
Dynamic data for other templates
If you need different data in the context depending on the URL (for example, you want an object retrieved using the ID in the URL), the pattern is similar to the above. The main difference is that you make use of the kwargs parameter passed to get_context_data(), which contains parameters derived from the page's URL.
As an example, the project builds table shows all of the builds for a project in a ToasterTable. It makes sense to add the project to the context so that its name can be shown at the top of the page. For a URL like http://localhost:8000/toastergui/project/X/builds, Toaster assigns the "X" in the URL to a parameter called pid; this can be retrieved in get_context_data() and used to fetch the project for which we are showing builds:
class ProjectBuildsTable(ToasterTable):
    # ... other methods ...

    def get_context_data(self, **kwargs):
        context = super(ProjectBuildsTable, self).get_context_data(**kwargs)

        # use the pid parameter extracted from the URL
        context['project'] = Project.objects.get(pk=kwargs['pid'])

        return context
This can then be referenced the usual way in the template (e.g. Template:Project).
Search
Search is automatically enabled on a ToasterTable. However, you may find that you are unable to search on the fields you would like to. This section explains how to fix that.
By default, ToasterTable searches against the queryset's model, using an OR query with icontains (case insensitive, contains string) matching. The fields used for the search are defined by the search_allowed_fields property of the model.
For MiniBuildsTable, the queryset's model is orm.models.Build; search_allowed_fields (at the time of writing) for Build is set to:
['machine', 'cooker_log_path', 'target__target', 'target__target_image_file__file_name']
Doing a search for a string like "test" would therefore construct a query OR clause like the following (pseudo-SQL):
... WHERE machine LIKE '%test%' OR cooker_log_path LIKE '%test%' OR target.target LIKE '%test%'
OR target.target_image_file.file_name LIKE '%test%'
(The actual SQL clause is far more complicated, as Django would have to use various JOIN statements to combine rows from multiple database tables.)
Note that the search_allowed_fields don't have to be fields of the model: they can be fields in related models (here, the Target and TargetImageFile models related to a Build).
This means that it's not possible to search by project name in the MiniBuildsTable. To make this possible, we could modify search_allowed_fields for the Build model to:
['machine', 'cooker_log_path', 'target__target', 'target__target_image_file__file_name', 'project__name']
This would now allow the Mini Builds table to be searched by project name as well.
Filter API
The classes for creating filters are defined in tablefilter.py.
A filter applies to a single column in the table. Any actions on a filter should filter records according to criteria which make sense with respect to that column. For example, you wouldn't add a filter to the "Completed on" column of the "All Builds" table which filters builds according to whether they failed or succeeded; but you would add a filter which filters the builds based on the time when the build was completed.
A filter adds an option to the column heading to filter in/out particular records or to remove filtering altogether.
Each filter has one or more actions associated with it. A filter also automatically gets a default action which turns off the filter and shows all the records again.
Each action changes the records shown in its associated ToasterTable, by applying a set of criteria to the query used to fetch records (e.g. show records for a single date, for a date range, or matching/not matching some other criteria related to the column).
To add a filter to a column, do the following:
- Create a TableFilter object for the column.
- Assign the filter to the column in the ToasterTable.
- Attach TableFilterAction objects to the TableFilter.
These steps are explained in detail below.
Add a table filter
The TableFilter class acts as a container for a group of TableFilterAction objects.
To create a TableFilter, instantiate it with a unique identifier (unique to the ToasterTable) and a text string which is displayed in the popup for the filter. The filters should be defined in the setup_filters() method for the ToasterTable.
Once the filter is defined, add it to the ToasterTable using the add_filter() method.
Here's an example of a TableFilter for the outcome column of MiniBuildsTable:
# already imported in tables.py, but shown here for completeness
from toastergui.tablefilter import TableFilter

class MiniBuildsTable(ToasterTable):
    # ... other methods ...

    def setup_filters(self, *args, **kwargs):
        # filter by outcome (succeeded or failed)
        outcome_filter = TableFilter(
            'outcome_filter',
            'Filter builds by outcome'
        )

        # add the filter to the ToasterTable
        self.add_filter(outcome_filter)
Internally, add_filter() uses a TableFilterMap in the ToasterTable, which maps from column names to TableFilters.
Note that the filter has no actions, so won't actually filter the table yet.
Associate a filter with a column
To associate the filter with a column, pass the name of the filter in the filter_name argument for the column. For example, to associate the outcome_filter defined above with the outcome column, change setup_columns() like this:
class MiniBuildsTable(ToasterTable):
    # ... other methods ...

    def setup_columns(self, *args, **kwargs):
        # ... other column definitions ...

        self.add_column(title='Outcome',
                        help_text='The outcome of the build',
                        hideable=True,
                        orderable=True,
                        static_data_name='outcome',
                        static_data_template=outcome_template,
                        filter_name='outcome_filter')
(Note the additional filter_name keyword passed to add_column().)
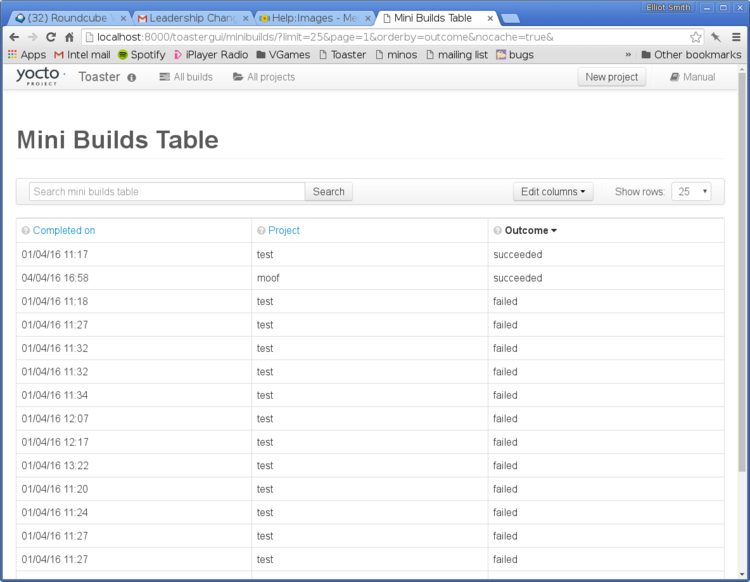
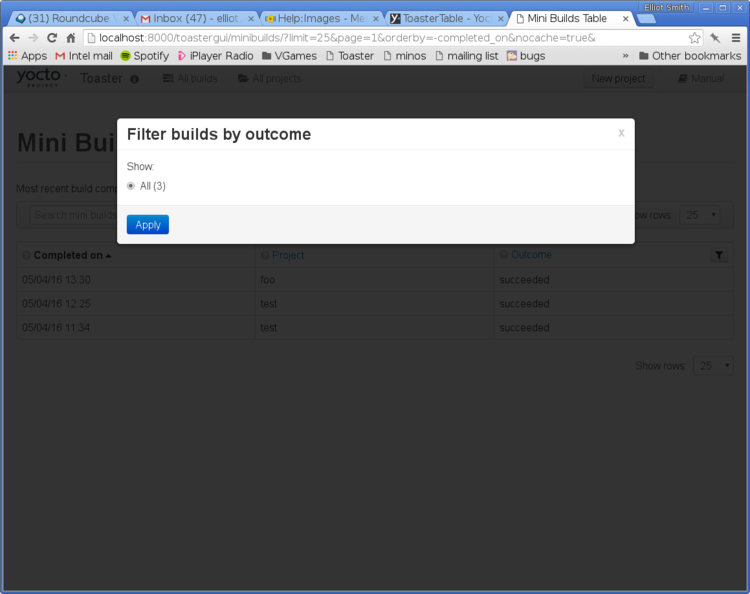
Now if you visit http://localhost:8000/toastergui/minibuilds, the outcome column in the table should show the filter icon; clicking on this opens the popup which allows a user to select the filter to apply. Because we have no actions on the filter, the only option is the "All" one:
outcome_filter is the string used to refer to the filter in the querystring; see the section How filters are applied for more details about how filters are applied.
Add table filter actions
The next step is to add actions to the filter.
TableFilterAction is the base class for an action associated with a filter. The following types of filter action (subclasses of TableFilterAction) are already implemented:
- TableFilterActionToggle: filter the records shown in the table by some arbitrary criteria; the action is either on or off.
- TableFilterActionDay: filter the records shown by day (yesterday or today).
- TableFilterActionDateRange: filter the records shown by a from/to date range.
In the case of TableFilterActionDay and TableFilterActionDateRange, you specify the field which is used for the filter action. In the case of TableFilterActionToggle, you can use arbitrary criteria for the action.
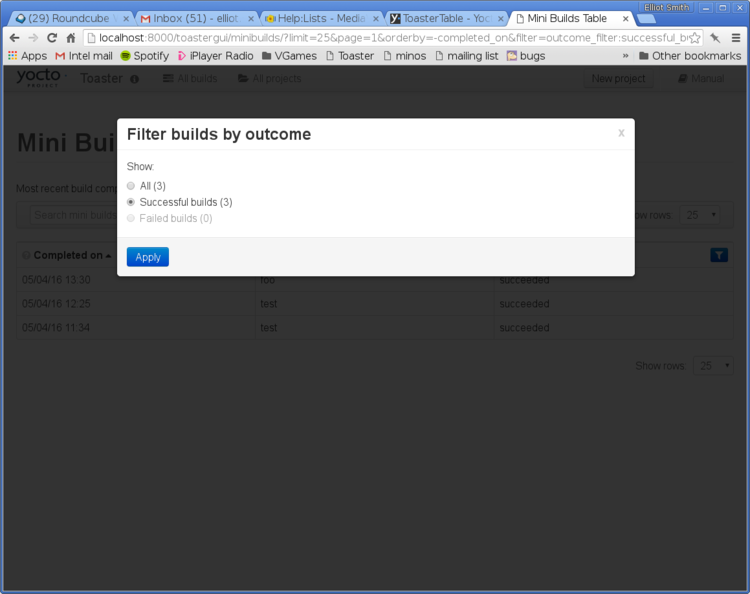
To add an action to a filter, create an instance of the desired action class and use the TableFilter.add_action() method to associate it with a filter. For example, here's how to add two actions to the outcome_filter defined earlier: one to show successful builds, and the other to show failed builds:
# already imported in tables.py, but shown here for completeness
from toastergui.tablefilter import TableFilter
from toastergui.tablefilter import TableFilterActionToggle

class MiniBuildsTable(ToasterTable):
    # ... other methods ...

    def setup_filters(self, *args, **kwargs):
        # filter by outcome (succeeded or failed)
        outcome_filter = TableFilter(
            'outcome_filter',
            'Filter builds by outcome'
        )

        successful_builds_action = TableFilterActionToggle(
            'successful_builds',
            'Successful builds',
            Q(outcome=Build.SUCCEEDED)
        )

        failed_builds_action = TableFilterActionToggle(
            'failed_builds',
            'Failed builds',
            Q(outcome=Build.FAILED)
        )

        outcome_filter.add_action(successful_builds_action)
        outcome_filter.add_action(failed_builds_action)

        # add the filter to the ToasterTable
        self.add_filter(outcome_filter)
Here's how this will render:
I'll break this down further to give a bit more detail about how the filter action is created. Here's the code which creates the filter action to show successful builds only:
successful_builds_action = TableFilterActionToggle(
    'successful_builds',
    'Successful builds',
    Q(outcome=Build.SUCCEEDED)
)
The arguments to TableFilterActionToggle have the following meanings:
- 'successful_builds' is the name of the action. This is used to map from the filter parameter in the querystring (see the next section).
- 'Successful builds' is the label shown next to the radio button which activates this action in the popup.
- Q(outcome=Build.SUCCEEDED) shows the criteria used to filter the records in the table's queryset when the filter action is applied. The Q object is part of the Django API; it should reference field names which are present in the queryset to be filtered and can use any criteria available to Q objects. In the case of the MiniBuildsTable, the queryset consists of Build objects; the Q(outcome=Build.SUCCEEDED) object is used to filter this queryset, so we effectively get the result of Build.objects.all().filter(Q(outcome=Build.SUCCEEDED)) when the action is applied.
For examples of how to add TableFilterActionDay and TableFilterActionDateRange filter actions, see the BuildsTable class in tables.py.
The next section explains how we go from clicking on a radio button in the filter popup to filtering the records shown in the table.
How filters are applied
The short version:
When a ToasterTable is rendered, a filter icon is shown on any column which has a filter_name defined for it. Clicking on this icon populates the filter dialog, then opens it so the user can select a filter to apply. When the user clicks on the "Apply" button in the dialog, new data for the table is requested, using the filter name, filter action, and filter value from the querystring. These parameters are used to filter the records which are shown in the table.
The long version:
- A filter icon for a column has a filter name associated with it.
- When a filter icon is clicked, the Toaster UI makes an Ajax request to the Toaster back-end for data about that filter name.
- When the filter data is received (in JSON format), the filter dialog is populated with radio buttons (one per action), labels (one per action) and any additional fields (e.g. date range fields for TableFilterActionDateRange actions). The count of records which will be returned by an action is part of the data returned by the back-end; if this is 0, the label and radio button are disabled. See static/js/table.js for the code which populates the filter dialog.
- The dialog is opened so the user can choose a filter to apply. The user clicks radio buttons, fills in fields etc.
- When the user clicks on the "Apply" button, the URL for the page is modified in place to reflect the filter criteria. The filter is represented in the URL by two querystring parameters:
filter=<filter name>:<filter action>: the filter name maps to the name used when creating the TableFilter object; and the filter action corresponds to one of the names of a TableFilterAction object added to the TableFilter. For example, filter=outcome_filter:successful_builds will map to the outcome_filter TableFilter and its successful_builds TableFilterAction.filter_value=<filter value string>: for a TableFilterActionToggle filter, this is always "on", to show that the filter is applied; for a TableFilterActionDay this is either "today" or "yesterday"; for a TableFilterActionDateRange, this is a "from,to" date range in the format "2015-12-09,2015-12-11".
- The table data is fetched via Ajax, using the filter and filter_value parameters as part of the URL. These set the filter name, action and value to use for filtering.
- The back-end applies the requested filter action to the queryset (as well as any existing search string). Each filter action has a set of criteria which it applies to the queryset, as follows:
- TableFilterActionToggle: The recordset is filtered by the criteria specified when the action is created (see Add table filter actions for an example).
- TableFilterActionDay: A date range clause is constructed at the time the filter action is applied. For example, if the field the filter action applies to is "completed_on", the day set for the TableFilterActionDay is "today", and today is 2016-03-05, the query clause (in pseudo-SQL) is "completed_on >= '2016-03-04 00:00:00' AND completed_on <= '2016-03-04 23:59:59'".
- TableFilterActionDateRange: This is similar to TableFilterActionDay, but the user specifies the start and end dates; these are in the filter_value variable in the querystring. For example, if the field the filter action applies to is "completed_on" and the date range is "2016-03-01,2016-03-04", the query clause (in pseudo-SQL) is "completed_on >= '2016-03-01 00:00:00' AND completed_on <= '2016-03-04 23:59:59'".
- The filtered queryset is returned as JSON.
- The Toaster UI code redraws the table with the filtered queryset.
