How to setup environment for ADT with 1.1 on Fedora 16
Installing the ADT
There are three method to install the ADT, which includes the cross-toolchain. Regardless of the installation you choose, you must source the cross-toolchain environment setup script before you use the toolchain.
- Use the ADT Installer Script: This method is the recommended way to install the ADT because it automates much of the process for you. For example, you can configure the installation to install the QEMU emulator and the user-space NFS, specify which root filesystem profiles to download, and define the target sysroot location.
- Use an Existing Toolchain Tarball: Using this method, you select and download an architecture-specific toolchain tarball and then hand-install the toolchain. If you use this method, you just get the cross-toolchain and QEMU - you do not get any of the other mentioned benefits had you run the ADT Installer script.
- Use the Toolchain from within a Yocto Project Build Tree: If you already have a Yocto Project build tree, you can build the cross-toolchain within tree. However, like the previous method mentioned, you only get the cross-toolchain and QEMU - you do not get any of the other benefits without taking separate steps.
We use the ADT Installer Script as an example to install ADT below.
Getting the ADT Installer Tartall
The ADT Installer is contained in the ADT Installer tarball. You can download the tarball of version 1.1 into any directory from http://downloads.yoctoproject.org/releases/yocto/yocto-1.1/adt_installer.
Configuring and Running the ADT Installer Script
Before running the ADT Installer script, you need to unpack the tarball. You can unpack the tarball in any directory you wish. Unpacking it creates the directory adt-installer, which contains the ADT Installer script (adt-installer) and its configuration file is adt_installer.conf. Before you run the script, however, you should examine the ADT Installer configuration file and be sure you are going to get what you want. Your configurations determine which kernel and filesystem image are downloaded. The following list describes the configurations you can define for the ADT Installer. For configuration values and restrictions, see the comments in the adt-installer.conf file:
- YOCTOADT_REPO: This area includes the IPKG-based packages and the root filesystem upon which the installation is based. If you want to set up your own IPKG repository pointed to by YOCTOADT_REPO, you need to be sure that the directory structure follows the same layout as the reference directory set up at http://adtrepo.yoctoproject.org. Also, your repository needs to be accessible through HTTP.
- YOCTOADT_TARGETS: The machine target architectures for which you want to set up cross-development environments.
- YOCTOADT_QEMU: Indicates whether or not to install the emulator QEMU.
- YOCTOADT_NFS_UTIL: Indicates whether or not to install user mode NFS. If you plan to use the Yocto Eclipse IDE plug-in against QEMU, you should in-stall NFS.
- YOCTOADT_ROOTFS_<arch>: The root filesystem images you want to download from the YOCTOADT_IPKG_REPO repository.
- YOCTOADT_TARGET_SYSROOT_IMAGE_<arch>: The particular root filesystem used to extract and create the target sysroot. The value of this variable must have been specified with YOCTOADT_ROOTFS_<arch>. For example, if you downloaded both minimal and sato-sdk images by setting YOCTOADT_ROOTFS_<arch> to "minimal sato-sdk", then YOCTOADT_ROOTFS_<arch> must be set to either minimal or sato-sdk.
- YOCTOADT_TARGET_SYSROOT_LOC_<arch>: The location on the development host where the target sysroot is created.
For working with Eclipse, we set the parameters in adt-installer.conf as below, we just install arm arch as an example:
  YOCTOADT_VERSION=1.1
  YOCTOADT_REPO=http://adtrepo.yoctoproject.org/$YOCTOADT_VERSION
  YOCTOADT_TARGETS="arm"
  YOCTOADT_QEMU="Y"
  YOCTOADT_NFS_UTIL="Y"
  YOCTOADT_ROOTFS_arm=" sato-sdk"
  YOCTOADT_TARGET_SYSROOT_IMAGE_arm=" sato-sdk "
  YOCTOADT_TARGET_SYSROOT_LOC_arm="$HOME/xuhongna/test-yocto/arm"
After you have configured the adt_installer.conf file, run the installer using the following command: adt_installer, before you run the script, you should make sure add the sudo authority to your user account. The installation is dependent on the “Packages” section of The Tocto Project Quick Start and other two packages of python-psyco and eglibc-devel. Once the installer begins to run, you are asked whether you want to run in in-teractive or silent mode. If you want to closely monitor the installation, choose “I” for interactive mode rather than “S” for silent mode. Follow the prompts from the script to complete the installation. Once the installation completes, the ADT, which includes the cross-toolchain, is installed. You will notice environment setup files for the cross-toolchain in /opt/poky/1.1, and image tarballs in the adt-installer directory according to your installer configurations, and the target sysroot located according to the YOCTOADT_TARGET_SYSROOT_LOC_<arch> variable also in your configura-tion file.
Working with Eclipse
Setting up the Eclipse IDE
To develop within the Eclipse IDE, you need to do the following:
Install the optimal version of the Eclipse IDE
For FC 16 you can find it at http://www.eclipse.org/downloads. From that site, choose the Eclipse Classic version particular to your development host. This version contains the Eclipse Platform, the Java Development Tools (JDT), and the Plug-in Development Environment. Once you have downloaded the tarball(Eclipse-SDK-3.7-linux-gtk-${arch}.tar.gz2), extract it into a clean directory. currently it will install the version 3.7.1. Avoid Memory Error we start eclipse use this command: eclipse --vmargs --XX:PermSize=256M
Configure the Eclipse IDE
1.Start the Eclipse IDE.
2.Make sure you are in your Workbench and select "Install New Software" from the "Help" pull-down menu.
3.Select indigo - http://download.eclipse.org/releases/indigo from the "Work with:" pull-down menu, if there is no indigo you should select Add… to add the URL.
4.Expand the box next to Programming Languages and select the Autotools Support for CDT (incubation) and C/C++ Development Tools boxes.
5.Complete the installation and restart the Eclipse IDE.
6.After the Eclipse IDE restarts and from the Workbench, select "Install New Software" from the "Help" pull-down menu.
7.Click the "Available Software Sites" link.
8.Check the box next to http://download.eclipse.org/tm/updates/3.3 and click "OK".
9.Select http://download.eclipse.org/tm/updates/3.3 from the "Work with:" pull-down menu.
10.Check the box next to TM and RSE Main Features.
11.Expand the box next to TM and RSE Optional Add-ons and select every item except RSE Unit Tests and RSE WinCE Services (incuba-tion).
12.Complete the installation and restart the Eclipse IDE.
13.If necessary, select "Install New Software" from the "Help" pull-down menu so you can click the "Available Software Sites" link again.
14.After clicking "Available Software Sites", check the box next to http://download.eclipse.org/tools/cdt/releases/indigo and click "OK".
15.Select http://download.eclipse.org/tools/cdt/releases/indigo from the "Work with:" pull-down menu.
16.Check the box next to CDT Main Features.
17.Expand the box next to CDT Optional Features and select C/C++ Remote Launch and Target Communication Framework (incubation).
18.Complete the installation and restart the Eclipse IDE.
Install the Eclipse Yocto Plug-in
1.Start up the Eclipse IDE.
2.In Eclipse, select "Install New Software" from the "Help" menu.
3.Click "Add..." in the "Work with:" area.
4.Enter http://www.yoctoproject.org/downloads/eclipse-plugin/1.1 in the URL field and provide a meaningful name in the "Name" field.
5.If you want to update the version of eclipse-plugin, you may get the tarball named like org.yocto.sdk-${Release}-${Date}-archive.zip, in step 4 you just click Archive… to point the location of the tarball.
6.Click "OK" to have the entry added to the "Work with:" drop-down list.
7.Select the entry for the plug-in from the "Work with:" drop-down list.
8.Complete the remaining software installation steps and then restart the Eclipse IDE to finish the installation of the plug-in.
Configure the Eclipse Yocto Plug-in
Configuring the Eclipse Yocto Plug-in involves setting the Cross Compiler options and the Target options. The configurations you choose become the default settings for all projects. You do have opportunities to change them later when you configure the project (see the following section). To start, you need to do the following from within the Eclipse IDE: Choose Windows -> Preferences to display the Preferences Dialog and Click Yocto ADT To configure the Cross Compiler Options, you must select the type of toolchain, point to the toolchain, specify the sysroot location, and select the target architecture.
Selecting the Toolchain Type: Choose between Standalone pre-built toolchain and Build system derived toolchain for Cross Compiler Options.
- Standalone Pre-built Toolchain: Select this mode when you are using a standalone cross-toolchain. For example, suppose you are an application developer and do not need to build a target image. Instead, you just want to use an architecture-specific toolchain on an existing kernel and target root filesystem.
- Build System Derived Toolchain: Select this mode if the cross-toolchain has been installed and built as part of the Yocto Project build tree. When you select Build system derived toolchain, you are using the toolchain bundled inside the Yocto Project build tree.
Point to the Toolchain: If you are using a standalone pre-built toolchain, you should be pointing to the /opt/poky/1.1 (in our version 1.1) directory. This is the location for toolchains installed by the ADT Installer or by hand. If you are using a system-derived toolchain, the path you provide for the Toolchain Root Location field is the Yocto Project's build directory.
Specify the Sysroot Location: This location is where the root filesystem for the target hardware is created on the development system by the ADT Installer. The QEMU user-space tools, the NFS boot process, and the cross-toolchain all use the sysroot location.
Select the Target Architecture: The target architecture is the type of hardware you are going to use or emulate. Use the pull-down Target Architecturemenu to make your selection. The pull-down menu should have the supported architectures. If the architecture you need is not listed in the menu, you will need to build the image.
Configuring the Target Options, You can choose to emulate hardware using the QEMU emulator, or you can choose to run your image on actual hardware.
QEMU: Select this option if you will be using the QEMU emulator. If you are using the emulator, you also need to locate the kernel and specify any custom options.If you selected Build system derived toolchain, the target kernel you built will be located in the Yocto Project build tree in tmp/deploy/images directory. If you selected Standalone pre-built toolchain, the pre-built image you downloaded is located in the directory you specified when you downloaded the image.
Most custom options are for advanced QEMU users to further customize their QEMU instance. These options are specified between paired angled brackets. Some options must be specified outside the brackets. In particular, the options serial, nographic, and kvm must all be outside the brackets. Use the man qemu command to get help on all the options and their use.
External HW: Select this option if you will be using actual hardware.
Click the OK button to save your plug-in configurations. In our demo, As the adt-installer.conf settings in section 1.2, we set “Yocto ADT” as the picture shows https://wiki.yoctoproject.org/wiki/images/3/33/Yocto.png
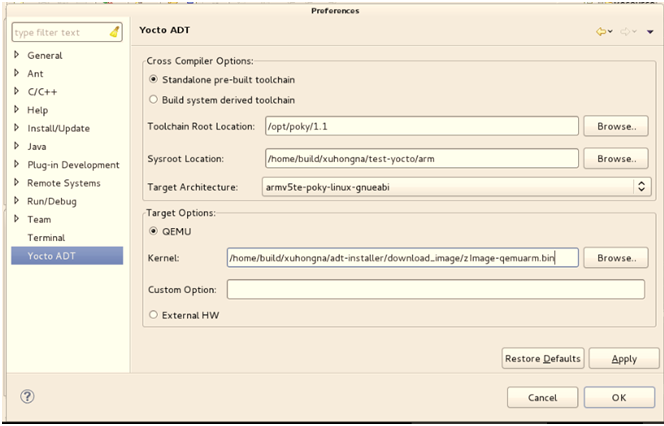
Creating the project
To create a project based on a Yocto template and then display the source code, follow these steps:
1.Start the Eclipse IDE.
2.Select File -> New -> Project.
3.Double click C/C++.
4.Double click C Project to create the project.
5.Expand Yocto ADT Project.
6.Select Hello World ANSI C Autotools Project. This is an Autotools-based project based on a Yocto Project template.
7.Put a name in the Project name: field. Do not use hyphens as part of the name.
8.Click Next.
9.Add information in the Author and Copyright notice fields.
10.Be sure the License field is correct.
11.Click Finish.
12.If the "open perspective" prompt appears, click "Yes" so that you in the C/C++ perspective.
13.The left-hand navigation pane shows your project. You can display your source by double clicking the project's source file.
Configuring the Cross-Toolchain
The earlier section, "2.1.4 Configuring the Eclipse Yocto Plug-in[[1]]", sets up the default project configurations. You can override these settings for a given project by following these steps:
1.Select Project -> Change Yocto Project Settings: This selection brings up the Project Yocto Settings Dialog and allows you to make changes specific to an individual project. By default, the Cross Compiler Options and Target Options for a project are inherited from settings you provide using the Preferences Dialog as described earlier in the "2.1.4 Configuring the Eclipse Yocto Plug-in" section. The Project Yocto Settings Dialog allows you to override those default settings for a given project.
2.Make your configurations for the project and click "OK".
3.Select Project -> Reconfigure Project: This selection reconfigures the project by running autogen.sh in the workspace for your project. The script also runs libtoolize, aclocal, autoconf, autoheader, automake --a, and ./configure.
Build the Project
To build the project, select Project -> Build Project. The console should update and you can note the cross-compiler you are using.
Starting QEMU in User Space NFS Mode
To start the QEMU emulator from within Eclipse, follow these steps: 1.Before you launch QEMU, you should configure the settings in Window->Preferences->Yocto ADT and create a C or C++ project based on the yocto templates as shown in section 2.2.
2.Expose the Run -> External Tools menu. Your image should appear as a selectable menu item.
3.Select your image in the navigation pane to launch the emulator in a new window.
4.If needed, enter your host root password in the shell window at the prompt. This sets up a Tap 0 connection needed for running in user-space NFS mode.
5.Wait for QEMU to launch.
6.Once QEMU launches, you can begin operating within that environment. For example, you could determine the IP Address for the user-space NFS by using the ifconfig command.
Deploying and Debugging the Appication
Once the QEMU emulator is running the image, you can deploy your appli-cation and use the emulator to perform debugging. Follow these steps to deploy the application.
1.Select Run -> Debug Configurations...
2.In the left area, expand C/C++Remote Application.
3.Locate your project and select it to bring up a new tabbed view in the Debug Configurations Dialog.
4.Enter the absolute path into which you want to deploy the application. Use the Remote Absolute File Path for C/C++Application: field. For ex-ample, enter /usr/bin/<programname>.
5.Click on the Debugger tab to see the cross-tool debugger you are using.
6.Click on the Main tab.
7.Create a new connection to the QEMU instance by clicking on new.
8.Select TCF, which means Target Communication Framework.
9.Click Next.
10.Clear out the host name field and enter the IP Address determined earlier.
11.Click Finish to close the New Connections Dialog.
12.Use the drop-down menu now in the Connection field and pick the IP Address you entered.
13.Click Debug to bring up a login screen and login.
14.Accept the debug perspective.
Running User-Space Tools
These are six tools until now which aims in developing and debugging appli-cations and images. You can run these user-space tools from within the Eclipse IDE through the Window -> YoctoTools menu. Once you pick a tool, you need to configure it for the remote target. Every tool needs to have the connection configured. You must select an existing TCF-based RSE connection to the remote target. If one does not exist, click New to create one.
Here are some specifics about the remote tools:
- OProfile: Selecting this tool causes the oprofile-server on the remote target to launch on the local host machine. The oprofile-viewer must be installed on the local host machine and the oprofile-server must be installed on the remote target, respectively, in order to use. You must compile and install theoprofile-viewer from the source code on your local host machine. Furthermore, in order to convert the target's sample format data into a form that the host can use, you must have oprofile version 0.9.4 or greater installed on the host. You can locate both the viewer and server from http://git.yoctoproject.org/cgit/cgit.cgi/oprofileui/ , After get the source, go to the dir oprofileui and run the command: ./autogen.sh then it will reports error that No package 'libglade-2.0' 'gtk+-2.0' 'gconf-2.0' found, then we should install them by the command: “sudo yum install -y libglade2-devel gconf2-devel glib2-devel “, then run make and make install to finish the installation.
- Lttng-ust: Install Eclipse Linux tools lttng 0.4.0 which is under http://download.eclipse.org/technology/linuxtools/update, then following this URL: http://wiki.eclipse.org/Linux_Tools_Project/LTTng to install Lttng parser library and start your eclipse. In Eclipse, File->New Project and create a new Lttng project. In YoctoTools, Lttng-user space, everything is the same just select the Import To Project to the create Lttng project. After running lttng, under your lttng pro-ject Traces, you should see one entry is created for your, right click on it and select trace type as kernel (This is a bug with upstream lttng which only support kernel type, but since the raw data format is the same, select it shouln't impact the data viewing in lttng-view), then you can open the Eclipse lttng-viewer to view the lttng trace.
- PowerTOP: Selecting this tool runs powertop on the remote target machine and displays the results in a new view called powertop. Time to gather data(sec): is the time passed in seconds before data is gathered from the remote target for analysis.show pids in wakeups list: corresponds to the -p argument passed to powertop.
- LatencyTOP and Perf: latencytop identifies system latency, while perf monitors the system's performance counter regis-ters. Selecting either of these tools causes an RSE terminal view to appear from which you can run the tools. Both tools refresh the entire screen to display results while they run.
- SystemTap: It is system-wide script-based tracing and profiling tool you may follow Tracing and Profiling wiki to work out a kernel module. After that click eclipse IDE’s YoctoTools->SystemTap then Connection should the remote IP address and Brower the kernel module in your native location.
Other tools
- Bitbake Commander
1.Swich to bitbake commander perspective on the right corner of eclipse window.
2.New a project ->Yocto Bitbake Commander -> New Yocto Project , input the Project Name and Project Location, if you want to clone from Yocto Git Repository you may select the check box or import a existing yocto project build tree: File-> Import->Existing Projects into Workspace ->click Next ->Select root directory -> Brower… to select the project, after that the project will appear in Projects blank space,select it and click Finish.
3.Select the bitbake project, File -> New -> Yocto BitBake Commander -> BitBake Recipe, for remote archive packages, after you enter the src_url and click on "populate", it should calculate the archive md4, sha256, license checksum and auto generated recipe file name.
4.For local source packages, after entering file:///absolute path to the package, then populate, it should calc license checksum value and come up recipe name based on the package directory name.
- HOB
1. Clone a yocto project build tree.
2. Import the cloned project, File->New->General->Projecte, click Next and give a name of the project, Using default Location to the git folder.
3.Right click the project -> Import -> General -> Existing Projects into Workspace -> Select root directory, click Browse to locate the yocto project folder.
4.Select the project, in eclipse toolbar, Project -> Lauch HOB.
5.Select Bitbake build directory which has compiled pseudo-native.